Category Archives: Microsoft

Windows & Office Key Activation / Removal

Windows Keys (slmgr):

Change Windows Product Key & Activate:

cmd
slmgr -ipk your-mak-key-here
slmgr -ato

Office Keys (ospp.vbs):

In order to deactivate an Office license you can use the “ospp.vbs” script located in the Office 2010 Installation directory.

This allows for a number of functions, my objective being the deactivation of a activated MAK for Visio & Office 2010.

These are the steps take for this scenario:

CD C:\Program Files\Microsoft Office\Office14

or

CD C:\Program Files (x86)\Microsoft Office\Office14

(32-bit Office 2010 on a 64-bit OS)

Displays a list of Office Product keys installed / Make a note of the Last 5 char of key to be removed:

script ospp.vbs /dstatus

Remove Office Product key activation:

cscript ospp.vbs /unpkey:M9TKQ

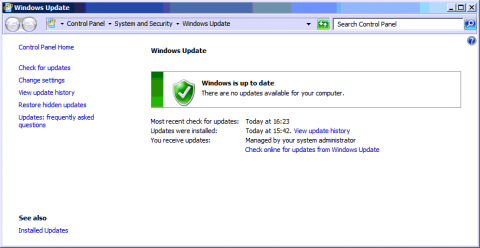
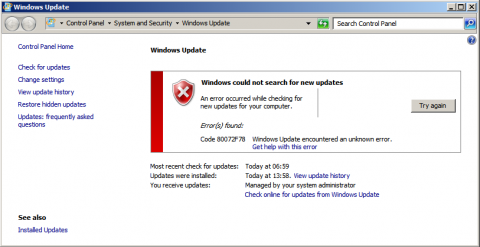
Windows Update | Error: 80072F78

Since when did Windows update become such a pain to update?

Just for a little background I’ve had this error on a number of occasions. WSUS is installed and configured within the environment, Windows updates are filtered and applied from WSUS (v3.2) running on Server 2003. The clients are configured using an update GPO. Windows firewall on the domain is turned off.

Servers are allowed outbound with no Firewall restrictions on the Cisco ASA

Clients aren’t allowed outbound with Firewall restrictions on the Cisco ASA. (They have internet access via a Proxy Server and I.E. settings are configured via GPO and a PAC file)

Error: 80072F78

After installing a new Windows Server 2008 R2 server I was greeted with this error after adding the server to the domain and performing manual windows updates. The error was displayed after clicking the “Check online for updates from Windows Update” – Although I want to apply the updates from WSUS I wanted to ensure that it was obtaining the latest updates as some may not have been approved.

I checked out some forums and found that this is a known issue with the “authroot.stl” cert installed. I downloaded a newer version and installed:

  1. Download: http://www.download.windowsupdate.com/msdownload/update/v3/static/trustedr/en/authrootstl.cab
  2. Extract
  3. Install (using the default settings, next, next, finish)

This didn’t work straight away until I reset all settings in I.E. 9.0 | after which the error disappeared and I could view the update options (or in my case no updates)

Although this resolved my issue it may not for all! I did find a number of different error codes and suggested fixes on my internet travels, most of these relating to proxy or connection restrictions. Microsoft have documented some debugging steps here: http://support.microsoft.com/kb/836941

Download the “Client Diagnostics Tool”

http://technet.microsoft.com/en-us/windowsserver/bb466192.aspx

netsh winhttp reset proxy

  1. wuauclt.exe /detectnow

Update: OK I thought the above would work… apparently not!

OK the secret is in this file:

C:\windows\windowsupdate.log

Delete the entire registry key HKLM\Software\Policies\Microsoft\Windows\WindowsUpdate

Which will revert the WUAgent to the original installed behavior of Automatic Updates and then set the desired behavior usign the Control Panel | Windows Update dialog.

Reference: 

https://www.trustwave.com/support/kb/KnowledgebaseArticle10726.aspx
Exchange 2010 | OWA Blank page (“HTTP 500” error)

Scenario: OWA web address shows login prompt and the user is able to logon, but a blank page or “HTTP 500” error displays once logged in. The page may also be blank depending on browser settings and if “show friendly URLs” is selected.

Even after a “IISReset /NoForce” or Server reboot, the problem is not fixed.

Cause: Looks like this problem is related to the “Microsoft Exchange Forms-Based Authentifcation Service” not being started or failed to start. This service can just be started from “services.msc”

net start MSExchangeFBA

Note: a number of posts state this problem is related to not having the”RPC over HTTP Proxy” role installed. However in my case the server had been working successfully.

If you have a new migration or build of Exchange 2010 then you may need to ensure that all required features are installed on the exchange server:

Open "Powershell" run as administrator<br />
Import-Module ServerManager<br />
Add-WindowsFeature NET-Framework,RSAT-ADDS,Web-Server,Web-Basic-Auth,Web-Windows-Auth,Web-Metabase,Web-Net-Ext,Web-Lgcy-Mgmt-Console,WAS-Process-Model,RSAT-Web-Server,Web-ISAPI-Ext,Web-Digest-Auth,Web-Dyn-Compression,NET-HTTP-Activation,RPC-Over-HTTP-Proxy -Restart<br />


DHCP Netsh | Incorrect IP listed

I recently setup a new server on a 192.168.x.x LAN IP range. The server was prepped ready to be taken to another site on the 10.0.x.x range. By pre-creating the DHCP component in the 192. zone it caused the DCHP IP to be listed incorrectly when running the netsh command below. This IP was listed even through all other aspects of DHCP and DNS were configured correctly.

Netsh dhcp show server &gt;&gt; c:\info_dhcp.txt

In order to correct this I used the NETSH tool.

Net stop dhcpserver
Netsh DHCP delete server DHCPserver.local 192.168.x.x
Net start dhcpserver
Netsh DHCP add server DHCPserver.local 10.0.x.x

Reference:

Windows 7 | Alternative Credential Manager

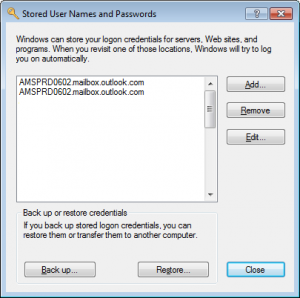
I wanted a quick method of clearing out all the information in credential manager in Windows 7 | Clear all entries from Windows 7 crediential manager, but unfortuately I couldn’t find one. Maybe someone has a nice little powershell command for this somewhere? Instead…

The easiest option is to use the “Stored User Names and Passwords” dialog and hit “remove” for each entry. Unfortunately you can’t select multiple fields but this it quicker than dealing with the “Windows 7 Credential manager” and less clicking required.

rundll32.exe keymgr.dll, KRShowKeyMgr

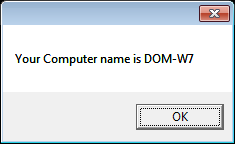
Show Host Name via VBS (ShowHost.vbs)

Simple script to show host name of the local machine in a popup window add code to “ShowHost.vbs”

Dim Shell
Dim CompName
Set Shell = WScript.CreateObject("WScript.Shell")
CompName = Shell.ExpandEnvironmentStrings("%COMPUTERNAME%")
Msgbox "Your Computer name is " &amp; CompName

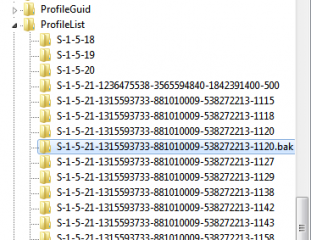
“You have been logged on with a temporary profile”

I see this error quite a few times when users logon to the Windows Server 2008 R2 RDS/TS server. The fix is pretty simple.

Use “regedit” and navigate to this entry:

HKEY_LOCAL_MACHINE\SOFTWARE\Microsoft\Windows NT\CurrentVersion\ProfileList

Find the entry with .bak listed and delete it. When the user logs back in the profile will be recreated.

Source: KB947242

Rename Windows Workstation/PC remotely

In order to rename a Windows system remotely you need to use the NETDOM command:

The command has been knocking about for a while now and is standard in Windows 2008. In Windows 2003 you can find it in the Windows Resource Tool Kit

Example:

netdom renamecomputer old_name /newname:new_name /userd:domain_admin_login /passwordd:domain_admin_pwd
netdom renamecompuer domold-W7 /newname:domnew-W7 /userd:administrator /passwordd:Passw0rd

Windows 7 Start Menu Shortcuts Location??

Arrrhhh! Why did Microsoft do with the Windows 7 start menu stored/saved shortcuts location?

What ever happened to just dumping it in the C:\Users\Public\Start Menu?? – I’m sure some boffin will say there was a good reason behind this? You can find the locations here:

User Start Menu Items: (I’ve listed the combination of getting to this)

  • c:\users\%username%\AppData\Roaming\Microsoft\Windows\Start Menu\Programs
  • %userprofile%\AppData\Roaming\Microsoft\Windows\Start Menu\Programs
  • %appdata%\Microsoft\Windows\Start Menu\Programs

Share Start Menu Items:

  • C:\ProgramData\Microsoft\Windows\Start Menu\Programs
  • %programdata%\Microsoft\Windows\Start Menu\Programs

Continue reading

WBAdmin | Daily Backup and Restore via Schedule

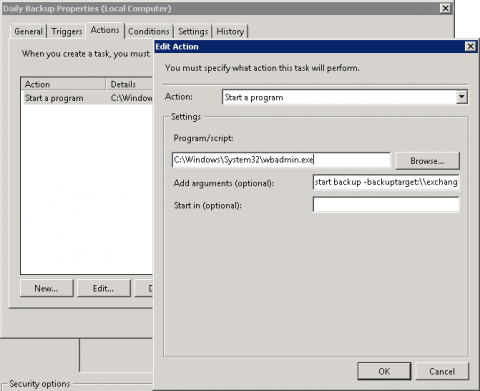
I’ve been working with the windows backup. One downside of this in Windows 2008 is that you can’t schedule a routine backup job to a network device. A work around is use a scheduled task and the WBAdmin tool.

Scheduled Task: (Create a scheduled task and us the following switches)

wbadmin start backup -backuptarget:\\server\backup$\ -vssFull -allCritical -quiet

This command will backup the entire drive including a system image. I don’t think the “allcritical” will work if you then specify items to exclude.

Show Backups Running:

Wbadmin get status

Full list of switches: cc742083

Continue reading

Solid State Drives SSD config (Best Practice)

From all the reading I have done on SSDs this is a known list of best practices in order to minimise read/write and maintain its health for longer:

Wiki SSD

Disable SuperFetch (Windows 7) this performs the same as Prefetch:

  • services.msc -> SuperFetch Properties -> Disabled
  • run -> “net stop superfetch”
  • run -> “sc config sysmain start= disabled” (This will set the Sysmain (Superfetch) Service startup to disabled)

Disable Disk Defragmenter Schedule (Windows 7):

  • run -> “dfrgui” (Disk Defrag Interface)
  • Click “Configure Schedule”
  • Click “Select disks…”
  • Unselect SSDs
  • Alternatively you could just remove all defrag schedules

Disable/Move Pagefile (Windows 7):

  • Win+Pause (System Properties) -> Advanced system settings -> “Advanced” Tab -> Performance “settings…”
  • In Performance Options -> “Advanced” Tab  -> Virtual Memory “Change…”
  • In Virtual Memory -> Untick “Automatically manage paging file size for all drives. -> Select SSD letter -> “No paging file” -> Set -> OK

Disable Disk Indexing (Windows 7):

  • My Computer -> Select SSD -> right click “Properties -> Untick “Allow files on this drive to have contents indexed to addtion to file properties”

Also disable the Search Service

  • run -> “net stop WSearch”
  • run -> “sc config WSearch start= disabled” (This will set the WSearch (Windows Search) Service startup to disabled)

Continue reading

WinRM for Event Forwarding

Windows Remote Management (WinRM) required by Windows Remote Shell command-line tool, Winrs, event forwarding, and Windows PowerShell 2.0.

WinRM service starts automatically on Windows Server 2008, but must be started manually on Windows Vista.

  • Show WinRM Status: “winrm get winrm/config”
  • Show WinRM Help: “winrm help config”
  • Setup WinRM: “winrm qc” (Quick Config)

Performs the following operations:

  • Starts the WinRM service, and sets the service startup type to auto-start.
  • Configures a listener for the ports that send and receive WS-Management protocol messages using either HTTP or HTTPS on any IP address.
  • Defines ICF exceptions for the WinRM service, and opens the ports for HTTP and HTTPS. (Only for the current user profile)

Reference: http://msdn.microsoft.com/en-us/library/aa384372(v=vs.85).aspx


Office 365 | Powershell

With the migration of many BPOS accounts to Office 365 there have been some major changes to the back-end resulting in a different method connecting via PowerShell in order to use command line syntax.

To use the PowerShell command line syntax for Office 365 you first need to initiate a connection to the 365 servers:

Powershell using “Microsoft Online Services Module for Windows PowerShell”

You may experience the following error when running Powershell Commands:

“File cannot be loaded because the execution of scripts is disabled on this system”

You can run this command to remove the execution restriction.

Set-ExecutionPolicy Unrestricted

Continue reading

Offline Domain Join (DJoin.exe)

In order to carryout an offline domain join you can use the following steps using an admin account or permissions to perform domain joins etc:

Logon to Domain Controller or Server (2008 / 2008R2)

djoin /provision /domain mydomain.com /Machine WorkstationName /SaveFile C:\Off-CLI.DJoin

/domain – Specifies the name of the domain to join.
/Machine – Specifies the name of the computer that you want to join to the domain.
/SaveFile – Saves provisioning data to a file.

Logon to the client PC/Workstation/Laptop (Windows 7)

djoin /RequestODJ /Loadfile C:\OFF-CLI.Djoin /LOCALOS /WINDOWSPATH %systemroot%

/Loadfile – Specifies the output from a previous provisioning command. (Where the offline file is)
/LOCALOS – Specifies the path to the Windows directory of the offline image.
/WINDOWSPATH – Specifies the path to the Windows directory of the offline image. (who doesn’t put this on c:\??

Don’t try and run this same piece of import code for other machines. The djoin import is unique to the PC name, therefore you will create a conflict. I found this out the hard way by getting “The trust relationship between this workstation and primary domain failed.” Error. If you do get this error message simply run through “My Computer -> Properties -> “Network ID” Wizard” or remove it from the domain and rejoin.

This is a nice little method for easy domain join, although have found that even with the system added to the domain you still can’t login as a user in order to create/setup their profile, so without a fully automated install / setup process it doesn’t save much time.

Microsoft DJoin Syntax: http://goo.gl/J7vsV

Remote Desktop Services (RDS) | Profile Paths

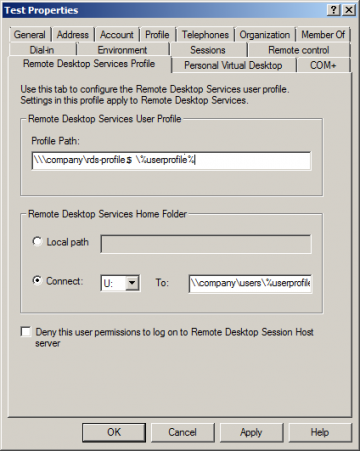
Setup of “Remote Desktop Services Profile” Paths.

This allows the direction/location of user profiles when using “RDS” although this process may seem straight forward, I forgot the config for this (must have been one of those days)

You can also configure this using GPO which will overide this setting. The GPO is located under: “Computer Configuration\Policies\Administrative Templates\Windows Components\Remote Desktop Services\Remote Desktop Session Host\Profiles”
If you get the “Your interactive logon privilege has been disabled” in the RDP connection you need to untick the “Deny this user permission to log on to any Terminal Server” Again this can be set using GPO.

Remember the “Local Path” is purely for a local drive i.e. C:\ D:\ and the Profile path can be mapped to a hidden share, this will prevent users getting confused where their files are if they also operate from a home folder which is visible on the network.
Excellent Best Practice on folder redirection in RDS here: http://goo.gl/aF5kB (Probably best just to follow this guide for it all)
Sources: http://technet.microsoft.com/en-us/library/cc742820.aspx

Removing “Help Protect and Improve Microsoft Office” prompt from RDS/TS

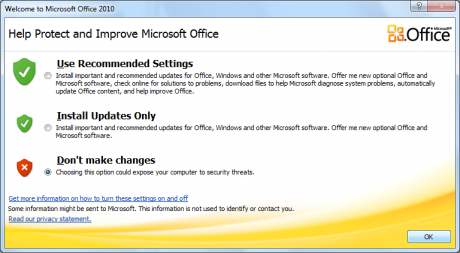
  1. Users without administration access are unable to select the desired options on the “Help Protect and Improve Microsoft Office” prompt which is display when first loading Microsoft Office 2010 as they required elevated permissions.

This issue can be resolved via a GPO. Unfortunately Office 2010 GPOs are not integrated into the standard GPOs within Windows Server so require an additional download.

Continue reading

TS/RDS Renaming “Remote Desktop Services Default Connection”

Updating “Remote Desktop Services Default Connection” text

Server 2008 R2
Edit the entry in the RDWebAccess.Config file.
C:\Windows\Web\RDWeb\App_Data\RDWebAccess.Config (Default location)

Server 2012 (Powershell):

set-RDWorkspace SYNTAX Set-RDWorkspace [-Name] [-ConnectionBroker] [-Name]

Example:

set-RDWorkspace -Name "My Remote Desktop Name here BLAH BLAH"

Adding “Remote Desktop” icon to the Remote Apps list: 

Click on Parameters and select the Always use the following command-line parameters. Type the following in the text box: /v: <FQDN of the RDSH server>.

References:

Terminal Service Manager – Logoff, Reset, Disconnect?

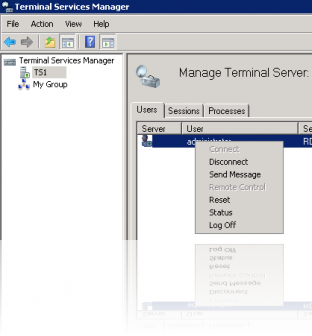
Just a quick not to clarify what each option actually does…

Disconnect: Disconnects a user from a session. The session remains attached to the terminal server in the disconnected state and currently running applications continue to run. When you attempt to reconnect to the server, you are reconnected to the same session from which you disconnected, even if you are reconnecting from a different computer. Applications that were left open when you disconnected remain running when you reconnect to the session, with no loss of data.

Reset: Enables you to delete a session instantly. Be aware that resetting a user’s session without warning can result in loss of data at that session. Reset a session only when it malfunctions or appears to have stopped responding.

Loggoff: Enables you to log off a user from a session on the server. Be aware that logging off a user without warning can result in loss of data at the user’s session. When you log off a user, all processes end and the session is deleted from the server.

Source: technet.microsoft.com


Delegate Distribution List Modification to Users in Outlook.

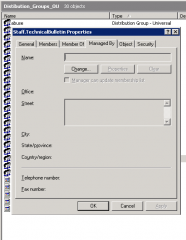
I always wondered what the “Managed By” tab was when displaying the properties of a Distribution or Security Group in Active Directory. By adding a user to the “Managed By” tab they can then be delgated to modify distribution lists using Outlook, obviously this helps with admin tasks and people complaning at you when someone is not in the list!!

  1. My Computer -> Administrative Tools -> Users and Computers
  2. Select OU – I create a seperate “Distribution_Groups_OU”
  3. Select “Distribution Group” right click “Properties”

Checking what users are part of the Distribution group in Outlook

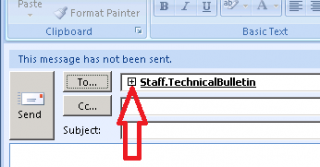
  1. Add Distribution in email using “to…”
  2. Simple click “+” to expand it:
  3. Note: This “+” does not apply on all distributions groups such as Dynamic groups so you may not see if. You will need to check AD to confirm what type of list it is.

Modifying Distribution group in Outlook (For the delegated user selected in the previous step “Managed By” tab)

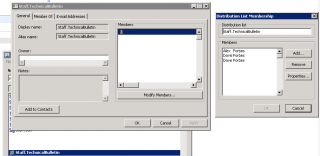
  1. Open Outlook -> Tools -> Address Book
  2. Locate Distribution Group -> Right Click -> Properties
  3. Click “Modify Members”
  4. Click “Add”
  5. Select Member Click “OK”


HP Proliant Server (Safemode / DSRM)

After a bad day with a Windows Server 2003 AD failure I had to do a system state restore using Directory Services Restore Mode (DSRM)

How hard could it be?? F8 in the BIOS before the Windows start right? Wrong!

This was on a HP Proliant ML310 G5 with multiple RAID & ILO devices using F8 as their configuration options, therefore every-time I pressed F8 (trying not to miss my window) I’d simply keep going into these config screens.

The Fix:

Wait until the initial RAID & ILO has loaded and processed to the next item then keep pressing “F5”

Yes F5 not F8!