Category Archives: Windows 7

Saving Windows Disk Space | Windows System Cleanup

Although nowadays HDD space is a cheap commodity there is always a Windows C:\ running somewhere with a partition that is busting at the seams and ready to explode. I’ve seen it too many times…

As there are a number of common culprits for these space eating monsters I’m going to post the fixes here in one sweet spot, the “Windows System Cleanup” post.

Windows “Hiberfil.sys”

Hibernate mode uses the hiberfil.sys file to store the current state (memory) of the PC on the hard drive and the file is used when Windows is turned back on.
Always a cause of taking up C:\ the easiest option is to switch it off. Use the following command line to disable:

Enter "powercfg.exe -h off"

Pagefile.sys is a windows system file used as a swap file and was designed to improve performance. Windows uses it as memory location in case the application you’re running ends up needing more RAM than you actually have. This file is stored on the C:\ root but can take up space. Best option is to move it or reduce it (Reducing isn’t really a recommended option)

  1. Right click on ‘PC’.
  2. Left click on ‘Properties’.
  3. Left click on ‘Advanced system configuration’.
  4. If needed, left click on ‘OK’.
  5. Select ‘Advanced options’ tab.
  6. Left click on ‘Configuration’ inside ‘Throughput’.
  7. Select ‘Advanced options’ tab.
  8. Left click on ‘Change’ inside ‘Virtual memory’.
  9. Edit your preferences.
  10. Close all the opened windows by accepting.

Windows “Search” Folder

?

Windows “WINSXS” Folder

Reference this post: Saving Windows Disk Space | Reducing Size of WINSXS folder | Server 2008 R2

Windows Shadow Copies

Shadow copies take up space in C:\System Volume Information (Hidden Folder) They can be reduced or completely deleted using VSSAdmin

Shows Shadow Copy Versions:

vssadmin list shadowstorage

Deletes all Shadow Copies:

vssadmin delete shadows /all

BranchCache “PeerDistRepub” folder

BranchCache is basically a cached version of updates from Microsoft. Folder can be flushed/cleared using netsh
Check Cache

netsh branchcache show status all

Flush Cache

netsh branchcache flush

Uninstall BranchCache Feature (PowerShell)

Uninstall-WindowsFeature Branchcache
Windows 7/10 | Remotely logoff user (Instantly)

Useful in the event of having to log someone off remotely. (i.e. if a users AD account has been disabled and you want to prevent them from using the system urgently)

You must have local administrator access to complete this. This process will logoff the user instantly.

Run CMD (As Administrator)
Obtain the session ID:

quser /server:COMPUTERNAMEHERE

Logoff session ID:

logoff ID /server:COMPUTERNAMEHERE

Example

Windows 7 | Delete Offline File Cache CSC Folder

After carrying out a domain migration on a PC the “offline files cache” still retains a local cache for the previous domain.

Within “Offline Files” (Control Panel) there is an option to “Delete temporary files” but this does not remove the “All offline files” cache located in the “C:\Windows\CSC” folder

The workaround to fully remove these files (and start a new offline sync) is to add the “FormatDatabase” registry entry which forces deletion.

This command will add the registry entry. After which reboot the system and all offline files will be removed:

reg add HKLM\SYSTEM\CurrentControlSet\services\CSC\Parameters /v FormatDatabase /t REG_DWORD /d 1

Change Windows 7 “Logon” Background

There’s two types of background images.

  1. Windows Desktop Backgrounds
  2. Windows Logon Backgrounds

This script will add the required flags and permissions to the registry and create the “dummy” jpg files which are used to display the “Logon” background. This is the screen which displays the user logon details (At “Logon”).

echo OFF
set bgfolder=%windir%\system32\oobe\Info\backgrounds\

REM Creates the backgrounds folder
md %bgfolder%

REM Creates the dummy background files
FOR %%f IN (backgroundDefault.jpg background1280x960.jpg background1024x768.jpg background1600x1200.jpg background1440x900.jpg background1920x1200.jpg background1280x768.jpg background1360x768.jpg background1024x1280.jpg background960x1280.jpg background900x1440.jpg background768x1280.jpg background768x1360.jpg) DO echo 2> %bgfolder%%%f 1> NUL

REM Gives all authenticated users the right to write these files
FOR %%f IN (backgroundDefault.jpg background1280x960.jpg background1024x768.jpg background1600x1200.jpg background1440x900.jpg background1920x1200.jpg background1280x768.jpg background1360x768.jpg background1024x1280.jpg background960x1280.jpg background900x1440.jpg background768x1280.jpg background768x1360.jpg) DO icacls %bgfolder%%%f /grant *S-1-5-11:(R,W,M)

REM Forces the use of the custom background permanently
reg add HKLM\Software\Microsoft\Windows\CurrentVersion\Authentication\LogonUI\Background /v OEMBackground /t REG_DWORD /d 1 /f
reg add HKLM\SOFTWARE\Policies\Microsoft\Windows\System /v UseOEMBackground /t REG_DWORD /d 1 /f

All you then need to do is add the background image you want to this folder directory: %windir%\system32\oobe\Info\backgrounds\

Windows Time Commands | Cheatsheet

Check time service is running (Local & Remote):

sc query w32time
sc \\HOSTNAME query w32time

Displays all local time information (Local & Remote):

w32tm /query /configuration
w32tm /query /configuration /computer:HOSTNAME

Display Windows Time service status (Local & Remote):

w32tm /query /status
w32tm /query /status /computer:HOSTNAME

Display Windows Time service source (Will return one line: local CMOS vs Server) (Local & Remote):

w32tm /query /source
w32tm /query /source /computer:HOSTNAME

Display a list of peers and their status:

w32tm /query /peers

Displays current time (local source)

Time /T

Resync local computer time against time server: (run on all servers, except time server)

w32tm /resync /rediscover 

Force local computer time to update against domain server (Local & Remote):

w32tm /config /syncfromflags:domhier /update
w32tm /resync /rediscover w32tm /resync
w32tm /config /syncfromflags:domhier /update /computer:HOSTNAME
w32tm /resync /rediscover w32tm /resync

Start time server via CLI (Local & Remote)

net start w32time
SC \\HOSTNAME net start w32time

Restore Windows Time Service (if it has been broken)

net stop W32Time
w32tm /unregister
w32tm /register
net start W32Time
sc query W32Time

Set Time Update NTP source

@echo off
net stop w32time
w32tm /config /syncfromflags:manual /manualpeerlist: 0.uk.pool.ntp.org
w32tm /config /reliable:yes
net start w32time
w32tm /query /peers
PAUSE

Event Viewer Error Message:

Event Type: Error 

Event Source: W32Time 

Event Category: None 
Event ID: 12

Description: Time Provider NtpClient: This machine is configured to use the domain hierarchy to determine its time source, but it is the PDC emulator for the domain at the root of the forest, so there is no machine above it in the domain hierarchy to use as a time source. It is recommended that you either configure a reliable time service in the root domain, or manually configure the PDC to synchronize with an external time source. Otherwise, this machine will function as the authoritative time source in the domain hierarchy. If an external time source is not configured or used for this computer, you may choose to disable the NtpClient.

To resolve the eventID 12:

  • w32tm /register

Reference: 

Enable ICMP (Ping) & WMI | CMD Line

Without enabling ICMP ping requests will not get a reply from the server.

Enable ICMP using “netsh firewall” (Old Method):

netsh firewall set icmpsetting 8

Enable ICMP using “netsh advfirewall” (New Method):

netsh advfirewall firewall add rule name="ICMP Allow incoming V4 echo request" protocol=icmpv4:8,any dir=in action=allow

Enable WMI using “netsh advfirewall” (New Method):

netsh advfirewall firewall set rule group="windows management instrumentation (wmi)" new enable=yes

Unable to Access DFS Share | Windows 7 Mapped Drives

Mapped network drive to DFS share is not allowing access.

“This operation is supported only when you are connected to the server”

If you try to remap the drive with different credentials the following error appears:

The network folder specified is currently mapped using a different username and password.

To connect using a different user name and password, first disconnect any existing mappings to this network share.

Looking in the EventVWR the following is logged:

EventID1004: Path \Server\DFS transitioned to slow link with latency = 115 and bandwidth = 13265936

  • Rebooting doesn’t fix the issue
  • Remapping doesn’t fix the issue.
  • Entering the direct server UNC path allows full access (as it should)
  • Applied regedit to force Auto Reconnect to the server but still didn’t fix the issue.
Windows Registry Editor Version 5.00

[HKEY_LOCAL_MACHINE\SOFTWARE\Microsoft\Windows\CurrentVersion\NetCache]
"SilentForcedAutoReconnect"=dword:00000001

Fix:

In the end the really simple workaround was to “Disable Offline File Sync” and reboot the system. All working again!

“Control Panel -> Sync Centre ->  Manage offline files -> Disable Offline Files”

Reference:

http://blogs.technet.com/b/askds/archive/2011/12/14/slow-link-with-windows-7-and-dfs-namespaces.aspx
https://www.conetrix.com/Blog/post/Fixing-Problem-With-Windows-7-Shared-Files-and-Mapped-Drives-Unavailable-Over-VPN.aspx

Windows Backup | Adding Multiple External HDDs

Windows Backup can be configured to use multiple external hard drives as the target. This way you can setup a hard drive rotation system i.e. Mon: USB_HDD1, Tue: USB_HDD2, Wed: USB_HDD1

Ideally both HDDS (or more) need to be connected at the same time when you configure the backup from the GUI. If you do not have both HDDS connected this can be accomplished using the WBADMIN command line tool.

Locate the HDD identifier using “get disk” and add it to the job using “-addtarget”.

wbadmin get disks
WBADMIN ENABLE BACKUP -addtarget:{xxxxxxxx-xxxx-xxxx-xxxx-xxxxxxxxxxxx}

Reference:

PSEXEC | Remove File Share Remotely

Sometime it takes time to go and speak to a user, then stop what they are doing so you can make a change or tweak on their PC/Laptop so I like to do this in the background remotely without their knowledge (Hey! I’m an Admin that’s what I do)

PSEXEC has become a good friend for doing this!
I usually dump the “psexec” exe in the c:\Windows\System32 folder so I don’t have to change CMD paths. (Remember you need to run CMD as the user with access to the remote system for this to work)

Remove Share Remotely:

psexec \\PCNAME net share <SHARENAME> /delete

Map Drive Remotely:

psexec \\PCNAME net use S: \\SERVER\SHARE

Adding “Trusted Sites” to IE10 | Regedit | BAT | GPO

I’ve been looking for a simple method to add trusted sites into Internet Explorer 10 since they removed the “Internet Explorer Maintenance” (“The Internet Explorer Maintenance (IEM) snap-in is replaced by the Internet Explorer 10 preference extension”) options from the Server 2012 GPO.

Unfortunately a number of the methods for “adding trusted sites” prevent the local user from being able to customise the list with any additional sites. The method below is the quickest I have found to add a site to the “trusted sites” whilst also allowing users customisation. The following will add “work.edwardsd.co.uk” to the trust sites list:

*.BAT File Method:

REM See http://technet.microsoft.com/en-us/library/cc732643.aspx for Reg Commands/Switches
REG ADD "HKEY_CURRENT_USER\Software\Microsoft\Windows\CurrentVersion\Internet Settings\ZoneMap\Domains\edwardsd.co.uk\work" /v "http" /t REG_DWORD /d 00000002 /Y

*.REG Method:

Windows Registry Editor Version 5.00
[HKEY_CURRENT_USER\Software\Microsoft\Windows\CurrentVersion\Internet Settings\ZoneMap\Domains\edwardsd.co.uk\work]
"https"=dword:00000002

Note: The dword number represents the following values:

  • 1: Intranet sites
  • 2: Trusted Sites
  • 3: Internet
  • 4: Restricted Sites.
"https"=dword:00000001
"https"=dword:00000002
"https"=dword:00000003
"https"=dword:00000004

GPO Method:
The alternative option would be to use a GPO, usually my preference however I found this a little bit more complex so opted for the *.BAT option. This is a top site for GPO guides: GPO to configure IE zones sites (remember if you use this method the users can’t make changes themselves, but great for a controlled environment.

Saving Windows Disk Space | Removing “Installer\$PatchCache$”

Running out of the diskspace on C:\ I found the C:\WINDOWS\Installer\$PatchCache$ to be massive! I used JamSoftware “treesize” to view what was taking up the space.

From research this folder can be safely deleted, however you MUST NOT delete the top level “Installer” folder “C:\WINDOWS\Installer” (only the sub-folders inside it)

A quick method for deleting this directory is:

Stop “Windows Installer Service”

net stop msiserver

Run the “Remove Directory” command (/q Quiet: /q | Removes all directories and files: /s)

rmdir /q /s %WINDIR%\Installer\$PatchCache$

Start “Windows Installer Service”

net start msiserver

Reference: http://goo.gl/SW5M9

Windows Update | Restart Prompt

“RESTART YOUR COMPUTER TO FINISH INSTALLING IMPORTANT UPDATES”

My life would be so much simpler if this prompt didn’t keep showing.

Yes we know Windows has updated…
Yes we know if needs a reboot…
No we can’t do it in the middle of the day… So don’t ask me again in 4hours time or infact ever (until I have rebooted), especially when it’s on a TS / RDS with multiple domain users connecting.

Although I do enjoy (sarcasm) having another email whinging about why the server is prompting for a reboot, when in fact, the update has already been applied. (Yes I do understand this is there for a reason, but sometimes it just isn’t practical to restart servers every-time, every-day of the week, this is what a reboot schedule is for!)
OK. RANT OVER…
I’m not sure why you can’t fully disable this, Microsoft’s way of ensuring you do actually reboot, however there are a few workarounds I’ve listed to help rid of that pesky message.

Temporary Method using CMD:

sc stop wuauserv

GPO Method (gpedit.msc):

Local Computer Policy / Computer Configuration / Administrative Templates / Windows Components / Windows Update / and disable Re-prompt for restart with scheduled installations.

Regedit:

This will allow you to set the 1440min “Re-prompt for restart with scheduled installations” to more that 1440min.
http://technet.microsoft.com/en-us/library/cc708449%28WS.10%29.aspx

Windows 7 | Alternative Credential Manager

I wanted a quick method of clearing out all the information in credential manager in Windows 7 | Clear all entries from Windows 7 crediential manager, but unfortuately I couldn’t find one. Maybe someone has a nice little powershell command for this somewhere? Instead…

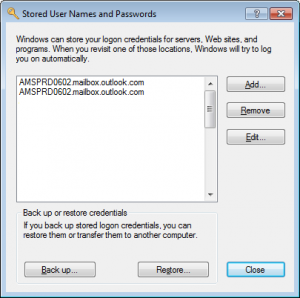
The easiest option is to use the “Stored User Names and Passwords” dialog and hit “remove” for each entry. Unfortunately you can’t select multiple fields but this it quicker than dealing with the “Windows 7 Credential manager” and less clicking required.

rundll32.exe keymgr.dll, KRShowKeyMgr

Show Host Name via VBS (ShowHost.vbs)

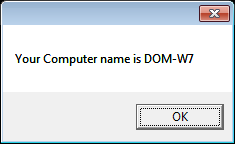
Simple script to show host name of the local machine in a popup window add code to “ShowHost.vbs”

Dim Shell
Dim CompName
Set Shell = WScript.CreateObject("WScript.Shell")
CompName = Shell.ExpandEnvironmentStrings("%COMPUTERNAME%")
Msgbox "Your Computer name is " & CompName

Windows 7 Start Menu Shortcuts Location??

Arrrhhh! Why did Microsoft do with the Windows 7 start menu stored/saved shortcuts location?

What ever happened to just dumping it in the C:\Users\Public\Start Menu?? – I’m sure some boffin will say there was a good reason behind this? You can find the locations here:

User Start Menu Items: (I’ve listed the combination of getting to this)

  • c:\users\%username%\AppData\Roaming\Microsoft\Windows\Start Menu\Programs
  • %userprofile%\AppData\Roaming\Microsoft\Windows\Start Menu\Programs
  • %appdata%\Microsoft\Windows\Start Menu\Programs

Share Start Menu Items:

  • C:\ProgramData\Microsoft\Windows\Start Menu\Programs
  • %programdata%\Microsoft\Windows\Start Menu\Programs

Continue reading

Solid State Drives SSD config (Best Practice)

From all the reading I have done on SSDs this is a known list of best practices in order to minimise read/write and maintain its health for longer:

Wiki SSD

Disable SuperFetch (Windows 7) this performs the same as Prefetch:

  • services.msc -> SuperFetch Properties -> Disabled
  • run -> “net stop superfetch”
  • run -> “sc config sysmain start= disabled” (This will set the Sysmain (Superfetch) Service startup to disabled)

Disable Disk Defragmenter Schedule (Windows 7):

  • run -> “dfrgui” (Disk Defrag Interface)
  • Click “Configure Schedule”
  • Click “Select disks…”
  • Unselect SSDs
  • Alternatively you could just remove all defrag schedules

Disable/Move Pagefile (Windows 7):

  • Win+Pause (System Properties) -> Advanced system settings -> “Advanced” Tab -> Performance “settings…”
  • In Performance Options -> “Advanced” Tab  -> Virtual Memory “Change…”
  • In Virtual Memory -> Untick “Automatically manage paging file size for all drives. -> Select SSD letter -> “No paging file” -> Set -> OK

Disable Disk Indexing (Windows 7):

  • My Computer -> Select SSD -> right click “Properties -> Untick “Allow files on this drive to have contents indexed to addtion to file properties”

Also disable the Search Service

  • run -> “net stop WSearch”
  • run -> “sc config WSearch start= disabled” (This will set the WSearch (Windows Search) Service startup to disabled)

Continue reading

WSUS (wuauclt.exe) | Updates CLI

Detectnow Option

Because waiting for detection to start can be a time-consuming process, an option has been added to allow you to initiate detection right away. On one of the computers with the new Automatic Update client installed, run this at command prompt:

wuauclt.exe /detectnow

Resetauthorization Option

WSUS uses a cookie on client computers to store various types of information, including computer group membership when client-side targeting is used. By default this cookie expires an hour after WSUS creates it. If you are using client-side targeting and change
group membership, use this option in combination with detectnow to expire the cookie, initiate detection, and have WSUS update computer group membership.

Note that when combining parameters, you can use them only in the order specified as follows:

wuauclt.exe /resetauthorization /detectnow

Windows Server Update Services (WSUS) Support Tools:

CLI for WUAUCLT:

Source: http://technet.microsoft.com/en-us/library/cc708617(WS.10).aspx

Outlook 2007 File Locations

To access the folder holding the toolbar, VBA, send & receive settings, and nickname files, copy and paste:

  • Vista/W7: %USERPROFILE%\AppData\Roaming\Microsoft\Outlook
  • XP: %USERPROFILE%\Application Data\Microsoft\Outlook

To see the message store files, copy and paste:

  • Vista/W7: %USERPROFILE%\AppData\Local\Microsoft\Outlook
  • XP: %USERPROFILE%\Local Settings\Application Data\Microsoft\Outlook

BCDEdit – VHD into boot.ini

bcdedit /copy {current} /d “XPP32-VHD”
bcdedit /set {ef3e950f-0d1f-11df-81c3-0009dd502a5a} device vhd=3D[J:]\Virtual_PC\Microsoft-VPC\Windows-XPP32\Windows-XPP_HDD_10gb_Office2003_DYN.vhd
bcdedit /set {ef3e950f-0d1f-11df-81c3-0009dd502a5a} osdevice vhd=3D[J:]\Virtual_PC\Microsoft-VPC\Windows-XPP32\Windows-XPP_HDD_10gb_Office2003_DYN.vhd
bcdedit /set {ef3e950f-0d1f-11df-81c3-0009dd502a5a} detecthal on
bcdedit /delete {6a8b1f82-071e-11df-8287-c6f21c814b9c} /cleanup
bcdedit /delete {ef3e950e-0d1f-11df-81c3-0009dd502a5a} /cleanup

Ref: Windows 7 to VHD