Arcserve Copy Job

Ensure the following settings are used, this will make sure that the folders being copied are added into the directory selected.

  • \\ServerName\C$\Department-Folder\
  • \\NewServerName\C$\New-Department-Folder\

Ensure the following setting is ticked:

  • Create the entire path from the Root.

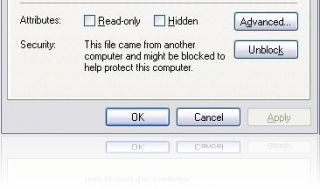
“This file came from another computer and might be blocked to help protect this computer”

OK, this option is simple to deal with:

  1. Right click the file
  2. Select “Unblock”
  3. Run the Application (*.exe)

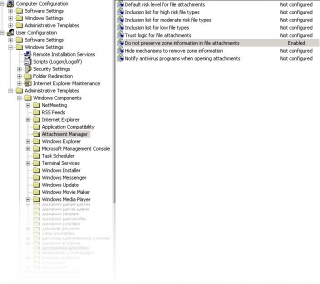
If you don’t want this option to keep coming up just change the following Group Policy setting:

  1. gpedit.msc
  2. User Configuration > Administrative Templates > Windows Components > Attachment Manager
  3. Enable: Do not preserve zone information in file attachments

“Cannot start Microsoft Office outlook”

Outlook 2003/2007 fails to open:

“Cannot start Microsoft Office outlook. Cannot open the outlook window”

Run the following run command:

  • Outlook.exe /resetnavpane

This little fix normally solves a number of outlook problems, so before doing anything run this… if this doesn’t work then I would look into further issues including different run switches.

Ref: I can’t start Microsoft Outlook

Add RDP/TS users for remote Access Local Security Permissions (Non Domain Controller)

Make sure that the Remote Desktop Users group has sufficient permissions to log on through Terminal Services.

  1. Click Start, click Run, type secpol.msc, and then click OK.
  2. Expand Local Policies, and then click User Rights Assignment.
  3. In the right pane, double-click Allow logon through Terminal Services. Make sure that the Remote Desktop Users group is listed.
  4. Click OK.
  5. In the right pane, double-click Deny logon through Terminal Services. Make sure that the Remote Desktop Users group is not listed, and then click OK.
  6. Close the Local Security Settings snap-in.

Make sure the user is added to the Remote Desktop Users group:

  1. Open Computer Management.
  2. In the console tree, click the Local Users and Groups node.
  3. In the details pane, double-click the Groups folder.
  4. Double-click Remote Desktop Users, and then click Add….
  5. On the Select Users dialog box, click Locations… to specify the search location.
  6. Click Object Types… to specify the types of objects you want to search for.
  7. Type the name you want to add in the Enter the object names to select (examples): box.
  8. Click Check Names.
  9. When the name is located, click OK.

Check the users or groups to Terminal Services RDP permissions:

  1. Open Terminal Services Configuration.
  2. In the Connections folder, right-click RDP-TCP.
  3. Click Properties.
  4. On the Permissions tab, click Add, and then add the desired users and =
    groups.

Task Scheduler Disk Defragmenter

  1. Open Control Panel
  2. Double-click Scheduled Tasks
  3. Double-click Add Scheduled Task
  4. On the Scheduled Task Wizard dialog, click Next
  5. Click Browse
  6. In the Select Program to Schedule dialog, navigate to the windows\system32 folder
  7. Select defrag.exe
  8. Click Open
  9. In the Scheduled Task Wizard dialog, type a name for the scheduled task (Disk Defragmenter, for instance)
  10. Under Perform this task, select how often you wish Disk Defragmenter to run
  11. Click Next
  12. Set the time at which you wish the Disk Defragmenter scheduled task
    to run. This should be a time when your computer is on, but not in
    heavy use.
  13. Select the frequency at which you want the Disk Defragmenter
    scheduled task to run (Every Day, Weekdays, or Every days, where
    is the number of days between scheduled runs)
  14. Click Next
  15. Enter a user name under which the Disk Defragmenter scheduled task
    will run. Note: This user must be an administrator on the local
    machine.
  16. Enter the password for the user you entered in the previous step
  17. Confirm the password for the user
  18. Click Next
  19. Check Open advanced properties for this task when I click Finish
  20. Click Finish
  21. In the Run text box, you should see the full path and command for
    defrag.exe. By default, this path is C:\WINDOWS\SYSTEM32\defrag.exe
  22. Append the drive letter for the drive you wish to defragment to the
    command in the Run text box. In a default installation, your Run
    command will look like this:
    C:\WINDOWS\SYSTEM32\defrag.exe C:
  23. Click OK
  24. In the Set Account Information dialog, enter and confirm the
    password for the user listed in Run as
  25. Click OK

Source: http://support.microsoft.com/kb/555098

NTFS Advanced Permissions Guide

Traverse Folder/Execute File

  • Traverse Folder: Allows or denies moving through a restricted folder to reach files and folders beneath the restricted folder in the folder hierarchy. Traverse folder takes effect only when the group or user=
    is not granted the “Bypass traverse checking user” right in the Group Policy snap-in. This permission does not automatically allow running program files.
  • Execute File: Allows or denies running program (executable) files.

List Folder/Read Data

  • List Folder: Allows or denies viewing file names and subfolder names within the folder. List Folder only affects the contents of that folder and does not affect whether the folder you are setting the permission on will be listed.
  • Read Data: Allows or denies viewing data in files.

Read Attributes

  • Allows or denies viewing the attributes of a file or folder, for example, “read-only” and “hidden”.

Read Extended Attributes

  • Allows or denies viewing the extended attributes of a file or folder. Extended attributes are defined by programs and may vary by program.

Create Files/Write Data

  • Create Files: Allows or denies creating files within the folder.
  • Write Data: Allows or denies making changes to a file and overwriting existing content.

Create Folders/Append Data

  • Create Folders: Allows or denies creating subfolders within the folder.
  • Append Data: Allows or denies making changes to the end of the file but not changing, deleting, or overwriting existing data.

Write Attributes

  • Allows or denies changing the attributes of a file or folder, for example, “read-only” or “hidden”.
  • The Write Attributes permission does not imply creating or deleting files or folders, it only includes the permission to make changes to the attributes of an existing file or folder.

Write Extended Attributes

  • Allows or denies changing the extended attributes of a file or folder. Extended attributes are defined by programs and may vary by program.
  • The Write Extended Attributes permission does not imply creating or deleting files or folders, it only includes the permission to make changes to the extended attributes of an existing file or folder.

Delete Subfolders and Files

  • Allows or denies deleting subfolders and files, even if the Delete permission has not been granted on the subfolder or file.

Delete

  • Allows or denies deleting the file or folder. If you don’t have Delete permission on a file or folder, you can still delete it if you have been granted Delete Subfolders and Files on the parent folder.

Read Permissions

  • Allows or denies reading permissions of a file or folder.

Change Permissions

  • Allows or denies changing permissions of the file or folder.

Take Ownership

  • Allows or denies taking ownership of the file or folder. The owner of a file or folder can always change permissions on it, regardless of any existing permissions that protect the file or folder.

Synchronize

  • Allows or denies different threads to wait on the handle for the file or folder and synchronize with another thread that may signal it. This permission applies only to multithreaded, multiprocessing programs.

Source: http://www.ntfs.com/ntfs-permissions-file-advanced.htm

Exchange 2007 | Remote Mobile Wipe

Use the EMC to perform a remote wipe on a mobile phone

You need to be assigned permissions before you can perform this procedure. To see what permissions you need, see the “Exchange ActiveSync device settings” entry in the Client Access Permissions topic.

1. In the console tree, navigate to Recipient Configuration > Mailbox.
2. Select the user from the Mailbox window.
3. In the action pane, click Manage mobile device, or right-click the user’s mailbox, and then click Manage mobile device.
4. Select the mobile phone you want to clear all data from.
5. In the Actions section, click Clear.
6. Click Clear again.

CONFIRMATION EMAIL:

Continue reading

Exchange 2007 | EMC Powershell

Open “Exchange Management Shell”

Shortcut refs to: (C:\WINDOWS\system32\windowspowershell\v1.0\powershell.exe -PSConsoleFile “C:\Program Files\Microsoft\Exchange Server\bin\exshell.psc1” -noexit -command “. ‘C:\Program Files\Microsoft\Exchange Server\bin\Exchange.ps1′”)

If this is not installed, look at the following article for installing Exchange: http://technet.microsoft.com/en-us/library/bb123694(EXCHG.80).aspx

Don’t get the Exchange Management Shell & Windows Powershell mixed up – for Windows Powershell see:


Adding send as permissions to mailbox:

Add-ADPermission "Mailbox" -User "Domain\User" -Extendedrights "Send As"

Adding full access permissions to mailbox:

Add-MailboxPermission "Mailbox" -User "Trusted User" -AccessRights FullAccess

Adding full access permissions to ALL mailboxes:

Get-Mailboxdatabase | Add-AdPermission -User "Username" -AccessRights GenericAll

List all mailbox stores in size order:

Get-MailboxStatistics | Sort-Object TotalItemSize -Descending | ft DisplayName,@{label="TotalItemSize(MB)";expression={$_.TotalItemSize.Value.ToMB()}},ItemCount

List all mailbox stores in size order (Export to CSV / on Desktop):

Get-MailboxStatistics -Database “Mailbox Database” | Select DisplayName, LastLoggedOnUserAccount, ItemCount, TotalItemSize, LastLogonTime, LastLogoffTime | Export-CSV test.csv

List all mailbox stores in size order:

Get-MailboxStatistics -Database “Mailbox Database” | Sort -Property TotalItemsize | Format-Table DisplayName, LastLoggedOnUserAccount, ItemCount, @{expression={$_.totalitemsize.value.ToMB()};label=”Size(MB)”}, LastLogonTime, LastLogoffTime

Purge all disconnected mailboxes:

(Add all the disconnected mailboxes into a var by typing the below:)

$users = Get-MailboxStatistics | where-object { $_.DisconnectDate -ne $null } | Select DisplayName,MailboxGuid,Database

Purge all the disconnected mailboxes in the previously made var by typing the below:

$users | ForEach { Remove-Mailbox -Database $_.Database -StoreMailboxIdentity $_.MailboxGuid -confirm:$false }

List all Public folder email addresses (output to file) 

I had a request for all the email addresses associated to public mailboxes, as these are not displayed on the client in Outlook.

Method1:

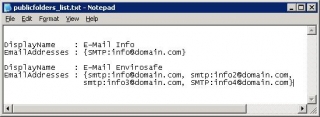
Displays a list of Public Folders & Email addresses output to TXT File (FL = Formats list with full text)

Get-PublicFolder -Recurse | Get-MailPublicFolder | fl DisplayName,Emailaddresses > c:\publicfolders_list.txt

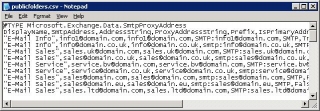
Method2: Displays a list of Public Folders & Email addresses output to CSV File:

# Export-CSV PowerShell Spreadsheet
Clear-Host
$FilePath = "c:\publicfolders.csv"
Get-MailPublicFolder | Select-Object DisplayName -expand emailaddresses| Export-CSV $FilePath

List Exchange 2007 Product Version

Get-ExchangeServer | fl name,edition,admindisplayversion

List Exchange 2007 Database Size

Get-MailboxDatabase | foreach-object {add-member -inputobject $_ -membertype noteproperty -name mailboxdbsizeinGB -value ([math]::Round(([int64](get-wmiobject cim_datafile -computername $_.server -filter ('name=''' + $_.edbfilepath.pathname.replace("\","\\") + '''')).filesize / 1GB),2)) -passthru} | Sort-Object mailboxdbsizeinGB -Descending | format-table identity,mailboxdbsizeinGB

List Exchange 2007 GUID

Get-MailboxDatabase -Identity "<server name>\<storage group name>\<database name>" | Format-Table Name, GUID

Public Folder Permissions via Powershell

Type the below, replacing ‘public folder name’ with your public folder name/path and you must keep the \ at the front of it and also replace ‘username’ with the username:

Add-PublicFolderClientPermission -Identity "\public folder name" -AccessRights Owner -User username

Owner can be replaced with the following roles:

  • None
  • Owner
  • PublishingEditor
  • Editor
  • PublishingAuthor
  • Author
  • Non-Editing Author
  • Reviewer
  • Contributor

Source: http://technet.microsoft.com/en-us/library/bb310789(EXCHG.80).aspx


Finding a Mailbox via Powershell

Get-Mailbox -identity findmyemail@mydomain.com

List Members of a Distribution List (output on screen)

Get-DistributionGroupMember-identity "staff.technical"

List Members of a Distribution List including their primary email address and formatted (output to CSV on C:\)

Get-DistributionGroupMember –identity “staff.technical” | ft name, primarysmtpaddress > c:\members.csv

List Members of a Dynamic Distribution List

$group = Get-DynamicDistributionGroup –identity “AllStaff-DL”
Get-Recipient –RecipientPreviewFilter $group.RecipientFilter | sort name | select name > C:\dlist_members.txt

Continue reading

MSN Live Ports

Here is a list of the ports MSN Live uses:

  • Messenger server: port 1493, 1542, 1863, 1963, 80 TCP and 443 TCP
  • File Transfer/Sharing Folders: local: 1544 and 6891 – in fact 6720-65535 TCP from one source
  • Messenger Update: remote: 80 local: 1457
  • Remote Assistance If available): 3389 TCP
  • Audio: local: , 1556, 11771, 13803 and generally 5004-65535 UDP
  • Remote Desktop and whiteboard: local/remote: 389, 522, 1503, 1720, and 1731
  • Launching Games: 80
  • Video Conference: TCP 9000-9999, 5004-65535 UDP + 80
  • Sign-In: remote: 443 local: 1484, 2400

Static Routes (Add/Delete)

To add a static IP route:

  • Start -> Run -> “CMD”:
  • route add 192.168.xxx.xxx MASK 255.255.255.0  192.168.xxx.xxx /p

To remove a static IP route:

  • Start -> Run -> “CMD”:
  • route delete destination (ie: route delete 192.168.xxx.xxx)

where: destination specifies either an IP address or network name for the remote TCP/IP host computer or network.
For example, to delete a static route to the 10.0.0.0 network, you type the following at a command prompt:
route delete 10.0.0.0

To print static routes:

  • Start -> Run -> “CMD”:
  • route print

Windows Vista Icon path

  • Windows Vista has some better more fancy default icons
  • These are not shown as the default ones when “changing folder icons”
  • Change the “look for icons in this file” path to:
  • %SystemRoot%\System32\imageres.dll

Report of all Users and Groups in my AD (DomainUinfo.vbs)

I usually get asked a lot for lists, specifically lists of AD users and members of groups etc. There are a couple of methods to obtain this…

Output user list in txt format using CMD:

  • net user /domain > C:users.txt (Only Lists Logon Usernames / no OU or Group Info)

Output user list in .txt format (more detail) using VBS:

  • Simple VBS Script to printout the AD information
  • Text file output to the same folder the script was run from…
  • I’ve slightly tweaked this script to make the output data more easy on the eyes.

Continue reading