Nice post I stumbled upon regarding DNS scavenging and how it actually works.
“Best Practice Analyzer” shows this should be enabled (But I’ve not seen any posts as to why this isn’t enabled by default)
Nice post I stumbled upon regarding DNS scavenging and how it actually works.
“Best Practice Analyzer” shows this should be enabled (But I’ve not seen any posts as to why this isn’t enabled by default)
Yes the year is 2016! and Yes we are still converting Server 2003 onto VMware! (I know Server 2003 is dead and 13 years behind the times, but there are still some instances in our organisation that still require it for old bespoke software that can’t be easily moved to Server 2013/2016)
When converting a physical “Server 2003” machine to a virtual machine using VMware Converter this error displays:
“Warning: Unable to locate the required Sysprep files. Upload them under ‘C:\ProgramData\VMware vCentre Converter Standalone\sysprep\svr2003’ on the Converter server machine. See ‘Help’ for more details”
Restore all Windows 10 default apps
Get-AppxPackage -allusers | foreach {Add-AppxPackage -register "$($_.InstallLocation)\appxmanifest.xml" -DisableDevelopmentMode}
Remove all Windows 10 default apps (from ALL user accounts)
Get-AppxPackage -AllUsers | Remove-AppxPackage
There’s two types of background images.
This script will add the required flags and permissions to the registry and create the “dummy” jpg files which are used to display the “Logon” background. This is the screen which displays the user logon details (At “Logon”).
echo OFF set bgfolder=%windir%\system32\oobe\Info\backgrounds\ REM Creates the backgrounds folder md %bgfolder% REM Creates the dummy background files FOR %%f IN (backgroundDefault.jpg background1280x960.jpg background1024x768.jpg background1600x1200.jpg background1440x900.jpg background1920x1200.jpg background1280x768.jpg background1360x768.jpg background1024x1280.jpg background960x1280.jpg background900x1440.jpg background768x1280.jpg background768x1360.jpg) DO echo 2> %bgfolder%%%f 1> NUL REM Gives all authenticated users the right to write these files FOR %%f IN (backgroundDefault.jpg background1280x960.jpg background1024x768.jpg background1600x1200.jpg background1440x900.jpg background1920x1200.jpg background1280x768.jpg background1360x768.jpg background1024x1280.jpg background960x1280.jpg background900x1440.jpg background768x1280.jpg background768x1360.jpg) DO icacls %bgfolder%%%f /grant *S-1-5-11:(R,W,M) REM Forces the use of the custom background permanently reg add HKLM\Software\Microsoft\Windows\CurrentVersion\Authentication\LogonUI\Background /v OEMBackground /t REG_DWORD /d 1 /f reg add HKLM\SOFTWARE\Policies\Microsoft\Windows\System /v UseOEMBackground /t REG_DWORD /d 1 /f
All you then need to do is add the background image you want to this folder directory: %windir%\system32\oobe\Info\backgrounds\
I always like to copy the video’s off my iPhone onto my PC and then resync them back to the phone (selecting only the ones I want) unfortunately this process isn’t always straight forward when you also want to rename them using their EXIF date & time values. As you may already know EXIF date works great with JPGs but there doesn’t seem to be so much of a “standard” when it comes to EXIF data for videos. The resync back to iPhone sometimes causes the incorrect date/time stamp in the Camera Roll. This really bothers me during iMovie creations because I like to reference (and know by the title) when the clip was created. Fortunately when the iPhone camera creates video files it also injects EXIF data (When using the native App). This is a great reference when you want to date/time rename the files but can be confusing when video files contain over 20 EXIF values all specifically related to date/time.
Check time service is running (Local & Remote):
sc query w32time
sc \\HOSTNAME query w32time
Displays all local time information (Local & Remote):
w32tm /query /configuration
w32tm /query /configuration /computer:HOSTNAME
Display Windows Time service status (Local & Remote):
w32tm /query /status
w32tm /query /status /computer:HOSTNAME
Display Windows Time service source (Will return one line: local CMOS vs Server) (Local & Remote):
w32tm /query /source
w32tm /query /source /computer:HOSTNAME
Display a list of peers and their status:
w32tm /query /peers
Displays current time (local source)
Time /T
Resync local computer time against time server: (run on all servers, except time server)
w32tm /resync /rediscover
Force local computer time to update against domain server (Local & Remote):
w32tm /config /syncfromflags:domhier /update w32tm /resync /rediscover w32tm /resync
w32tm /config /syncfromflags:domhier /update /computer:HOSTNAME w32tm /resync /rediscover w32tm /resync
Start time server via CLI (Local & Remote)
net start w32time
SC \\HOSTNAME net start w32time
Restore Windows Time Service (if it has been broken)
net stop W32Time w32tm /unregister w32tm /register net start W32Time sc query W32Time
Set Time Update NTP source
@echo off net stop w32time w32tm /config /syncfromflags:manual /manualpeerlist: 0.uk.pool.ntp.org w32tm /config /reliable:yes net start w32time w32tm /query /peers PAUSE
Event Viewer Error Message:
Event Type: Error
Event Source: W32Time
Event Category: None
Event ID: 12
Description: Time Provider NtpClient: This machine is configured to use the domain hierarchy to determine its time source, but it is the PDC emulator for the domain at the root of the forest, so there is no machine above it in the domain hierarchy to use as a time source. It is recommended that you either configure a reliable time service in the root domain, or manually configure the PDC to synchronize with an external time source. Otherwise, this machine will function as the authoritative time source in the domain hierarchy. If an external time source is not configured or used for this computer, you may choose to disable the NtpClient.
To resolve the eventID 12:
w32tm /register
Reference:
I get really frustrated that the Nextgen plugin for WordPress does not have a simple icon which allows a quick way to insert a “single” image from the gallery. The options in the “Add New Post” screen only seem to allow a whole gallery to be selected…
This is how to add one image to a post manually (provided you know the image ID)
There are some other shortcode options available here Nextgen Shortcode.
singlepic id=XXX float=
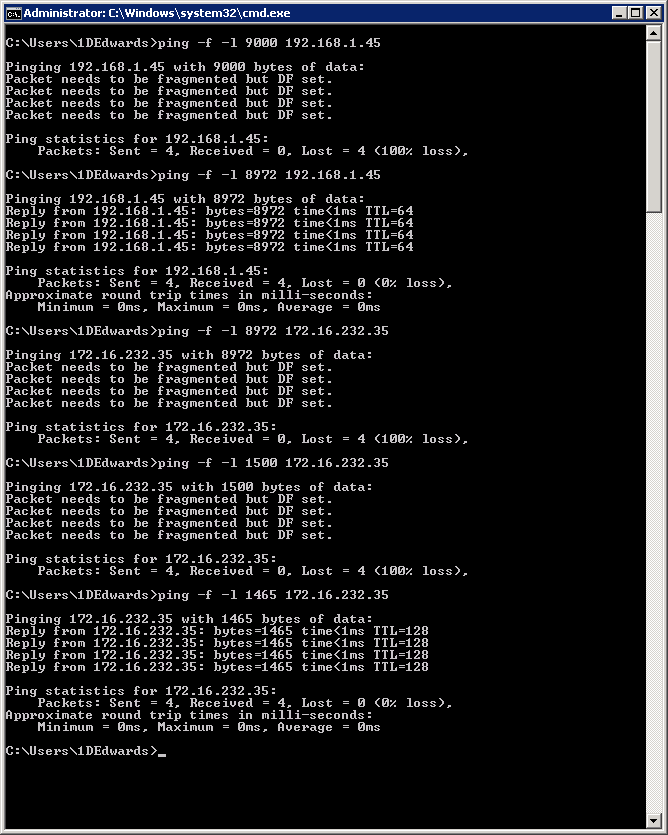
I usually configure JumboFrames on iSCSI devices. The quickest way to do this is with a direct Ethernet cable from iSCSI to Server (Configuring seperate LAN IPS for both devices)
To test that JumboFrames is enabled on the network cards I use the PING method and modify the frame size. Default packet sizes are 1500bytes (MTU).
192.168.1.45 (Is configured for Jumbo Frames) – Althought the Jumboframe MTU is 9000bytes there are some overheads in the packets therefore you need to use an MTU of 8972bytes
172.16.232.35 (Is NOT configured for Jumbo Frames) – You can see below the packets fail with “Packet needs to be fragmented but DF set”
Add/Remove a DNS record without the GUI
Add
dnscmd [ServerName] /recordadd [ZoneName] [NodeName] RRType> <RRData]
dnscmd UK-WDC01 /RecordAdd edwardsd.local UK-ESX01 A 192.168.1.5
Delete
dnscmd <ServerName> /recorddelete <ZoneName> <NodeName> <RRType> <RRData>[/f]
dnscmd UK-WDC01 /recorddelete edwardsd.local UK-ESX01 A 192.168.1.5
Reference: DNSCMD Examples
A few random PowerShell commands in Windows to help complete tasks:
Create New AD User:
New-ADUser -SamAccountName U1 -Name "User 1" -AccountPassword (ConvertToSecureString -AsPlainText "p@ssw0rd" -Force) -Enabled $true -Path 'OU=Test,DC=FABRIKAM,DC=COM'
Displays if “Desktop Experience” is installed:
Get-WindowsFeature *Desktop*
Installs “Desktop Experience” Feature:
Add-WindowsFeature Desktop-Experience
Remove Windows Patches
wusa /uninstall /kb:2952664
Clear all log entries
Although previous logs in event viewer can be helpful for diagnostics, I find old errors sometime cloud the current issues. In order to quickly clear all evertvwr logs entries you can use the following powershell command
wevtutil el | Foreach-Object {Write-Host "Clearing $_"; wevtutil cl "$_"}
Bypass code Execution
Usually if you get this error “PowerShell says “execution of scripts is disabled on this system.” the quick option is to bypass the execution policy:
Set-ExecutionPolicy Unrestricted
Are the Sandisk Extreme Pro 95MB/s SD Cards really worth the extra ££ ?
I benchmarked the following cards using CrystalDiskMark. The results show that the 95MB/s didn’t perform as well as expected. This might not be the most scientific of tests but were completed under the same conditions, same machine using a built in SD Card reader connected directly to the motherboard headers.
Sequential Read | Sequential Write | |
10MB/s | 19.260 | 5.084 |
30MB/s | 18.91 | 17.69 |
45MB/s | 31.33 | 26.23 |
95MB/s | 31.20 | 27.21 |
My configuration of the HP Microserver G1810T uses all 4 x HDD disk bays (2 x RAID1) with 1 x HDD (2.5″) attached to the secondary SATA connector on the motherboard.
This 5th disk for the OS was configured under the controller options to use RAID0.
When installing Windows Server 2012 R2 for the first time you will need to specify the B120i controller drivers for Windows to be able to see the disk.
The driver can be downloaded from the HP Microserver webpage and is listed under the “Driver – Storage” section.
The ILO made it easy for me to install Windows remotely from my desktop and attaching virtual media (ISO) and folders. Continue reading
DNS timeout
Having had a problem with my TalkTalk internet connection for months I thought the issue was related to TalkTalk DNS settings however this was actually due to the “UDP flood defense” setting on the Draytek “Firewall” which blocks DNS queries after a threshold value.
The symptoms were that DNS would just stop working, no DNS resolution at all, NSLOOKUPs would simply timeout but ping and IP resolution would function normally. Rebooting the Draytek would magically fix the issue.
The fix was to simply increase the “packet/sec Threshold” or “disable” the setting.
Note: The DoS defense settings are not enabled by default
iCACLS
Backup NTFS permissions:
icacls D:\MyDirectory /save \\server\Backup\%computername%_iCACLS_NTFS.txt /t /c
Restore NTFS permissions:
icacls D:\MyDirectory /save \\server\Backup\%computername%_iCACLS_NTFS.txt /t /c
SubINACL Continue reading
Configuring iDRAC IP (From Windows)
If you want to configure the iDRAC while in Windows the best option is to install “Dell Open Manage Server Administrator” this will allow you to open the web interface and assign the iDRAC IP. The default iDRAC IP is “192.168.0.120” so unless you have a system on this subnet to connect you will need to use another method.
If you are configuring iDRAC outside windows the default login is:
Unable to connect to iDRAC IP:
If you are unable to connect to the iDRAC via HTTP/Web Interface even though it is responding to ICMP (Ping) request it most likely needs a kick! or a reboot (of just that component) Best option is to putty into it.
Resets/Reboots iDRAC:
Unable to connect to iDRAC “Maximum number of user sessions is reached”
I tried to SSH to the IP using putty (Method Above) but got the same error.
In order to resolve this I used the following command from another server which had Dell Open Manage installed.
racadm -r 192.168.1.2 -u root -p Passw0rd racreset soft racadm -r 192.168.1.2 -i racreset soft
Downloads:
Quickest solution to stop this annoying update prompt is to use this regedit and which modifies the “Update” DWORD.
This update prompt is even more annoying if the user does not have local administrator rights.
Windows Registry Editor Version 5.00 [HKEY_LOCAL_MACHINE\SOFTWARE\Wow6432Node\JavaSoft\Java Update\Policy] "EnableJavaUpdate"=dword:00000000 "EnableAutoUpdateCheck"=dword:00000000
Without enabling ICMP ping requests will not get a reply from the server.
Enable ICMP using “netsh firewall” (Old Method):
netsh firewall set icmpsetting 8
Enable ICMP using “netsh advfirewall” (New Method):
netsh advfirewall firewall add rule name="ICMP Allow incoming V4 echo request" protocol=icmpv4:8,any dir=in action=allow
Enable WMI using “netsh advfirewall” (New Method):
netsh advfirewall firewall set rule group="windows management instrumentation (wmi)" new enable=yes
“Unable to create “datastore” in vSphere client”
Call “HostStorageSystem.ComputeDiskPartitionInfo” for object “storageSystem” on ESXi “172.16.233.55” failed.
I’ve been using VMWare converter and Veeam Replication for a while now but still ask myself the question of “How long will this take to migrate or P2V”
Here’s some results to help with the expected performance…
1 VM Move – Server to Server on LAN (1GBPS Switch)
1 VM Restore – Reverse Incremental Backup on iSCSI to Server on LAN (1GBPS Switch)