Category Archives: Windows Server 2008

TS Web Access not working – ActiveX not installed or enabled

Microsoft RDP ActiveX Control is disabled when you install Windows XP Service Pack 3 or Windows Small Business Server 2003 SP1.

Use the Manage Add-ons dialog in Internet Explorer to enable the Terminal Services ActiveX Control, if the ActiveX control is not listed in Manage Add-ons dialog deleting the following registry keys:

Option1:

HKCU\Software\Microsoft\Windows\CurrentVersion\Ext\Settings\{7390f3d8-0439-4c05-91e3-cf5cb290c3d0}
HKCU\Software\Microsoft\Windows\CurrentVersion\Ext\Settings\{4eb89ff4-7f78-4a0f-8b8d-2bf02e94e4b2}

Option2:

run -> cmd.exe /C “cscript %systemroot%\Installer\TSClientMsiTrans\tscuinst.vbs”

Once you delete these keys, the activeX control should be enabled.
List all AD users & email addresses

Simply put this into the Start -> Run bar and hit enter! to get a print out of users & email addresses within the domain.

  • cmd /c dsquery.exe * -limit 0 -filter “(&(objectCategory=person)(objectClass=user)(mail=*))” -attr name mail >”c:\PrimaryEmailAddresses.txt”
  • cmd /c csvde.exe -r “(&(objectCategory=person)(objectClass=user)(mail=*))” -l name,mail -f “c:\PrimaryEmailAddresses.csv”

Windows BCDEdit

“bcdedit”

Show All Entries: bcdedit /v
Delete: bcdedit /delete {XXXXXXXX-XXXX-XXXX-XXXX-XXXXXXXXXXXX}
Copy: bcdedit /copy { XXXXXXXX-XXXX-XXXX-XXXX-XXXXXXXXXXXX } /d “Name Here”
Set Time: bcdedit /timeout 5
Set Default: bcdedit /default { XXXXXXXX-XXXX-XXXX-XXXX-XXXXXXXXXXXX }

http://go.microsoft.com/fwlink/?LinkId=109528 (BCDEdit Commands)
http://technet.microsoft.com/en-us/library/dd799299%28WS.10%29.aspx (Adding
VHD)

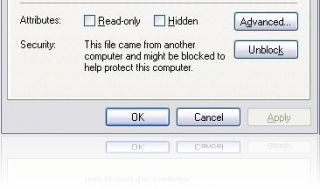
“This file came from another computer and might be blocked to help protect this computer”

OK, this option is simple to deal with:

  1. Right click the file
  2. Select “Unblock”
  3. Run the Application (*.exe)

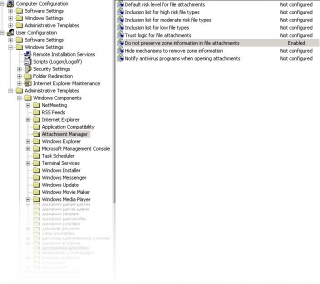
If you don’t want this option to keep coming up just change the following Group Policy setting:

  1. gpedit.msc
  2. User Configuration > Administrative Templates > Windows Components > Attachment Manager
  3. Enable: Do not preserve zone information in file attachments

Add RDP/TS users for remote Access Local Security Permissions (Non Domain Controller)

Make sure that the Remote Desktop Users group has sufficient permissions to log on through Terminal Services.

  1. Click Start, click Run, type secpol.msc, and then click OK.
  2. Expand Local Policies, and then click User Rights Assignment.
  3. In the right pane, double-click Allow logon through Terminal Services. Make sure that the Remote Desktop Users group is listed.
  4. Click OK.
  5. In the right pane, double-click Deny logon through Terminal Services. Make sure that the Remote Desktop Users group is not listed, and then click OK.
  6. Close the Local Security Settings snap-in.

Make sure the user is added to the Remote Desktop Users group:

  1. Open Computer Management.
  2. In the console tree, click the Local Users and Groups node.
  3. In the details pane, double-click the Groups folder.
  4. Double-click Remote Desktop Users, and then click Add….
  5. On the Select Users dialog box, click Locations… to specify the search location.
  6. Click Object Types… to specify the types of objects you want to search for.
  7. Type the name you want to add in the Enter the object names to select (examples): box.
  8. Click Check Names.
  9. When the name is located, click OK.

Check the users or groups to Terminal Services RDP permissions:

  1. Open Terminal Services Configuration.
  2. In the Connections folder, right-click RDP-TCP.
  3. Click Properties.
  4. On the Permissions tab, click Add, and then add the desired users and =
    groups.

Task Scheduler Disk Defragmenter

  1. Open Control Panel
  2. Double-click Scheduled Tasks
  3. Double-click Add Scheduled Task
  4. On the Scheduled Task Wizard dialog, click Next
  5. Click Browse
  6. In the Select Program to Schedule dialog, navigate to the windows\system32 folder
  7. Select defrag.exe
  8. Click Open
  9. In the Scheduled Task Wizard dialog, type a name for the scheduled task (Disk Defragmenter, for instance)
  10. Under Perform this task, select how often you wish Disk Defragmenter to run
  11. Click Next
  12. Set the time at which you wish the Disk Defragmenter scheduled task
    to run. This should be a time when your computer is on, but not in
    heavy use.
  13. Select the frequency at which you want the Disk Defragmenter
    scheduled task to run (Every Day, Weekdays, or Every days, where
    is the number of days between scheduled runs)
  14. Click Next
  15. Enter a user name under which the Disk Defragmenter scheduled task
    will run. Note: This user must be an administrator on the local
    machine.
  16. Enter the password for the user you entered in the previous step
  17. Confirm the password for the user
  18. Click Next
  19. Check Open advanced properties for this task when I click Finish
  20. Click Finish
  21. In the Run text box, you should see the full path and command for
    defrag.exe. By default, this path is C:\WINDOWS\SYSTEM32\defrag.exe
  22. Append the drive letter for the drive you wish to defragment to the
    command in the Run text box. In a default installation, your Run
    command will look like this:
    C:\WINDOWS\SYSTEM32\defrag.exe C:
  23. Click OK
  24. In the Set Account Information dialog, enter and confirm the
    password for the user listed in Run as
  25. Click OK

Source: http://support.microsoft.com/kb/555098

Report of all Users and Groups in my AD (DomainUinfo.vbs)

I usually get asked a lot for lists, specifically lists of AD users and members of groups etc. There are a couple of methods to obtain this…

Output user list in txt format using CMD:

  • net user /domain > C:users.txt (Only Lists Logon Usernames / no OU or Group Info)

Output user list in .txt format (more detail) using VBS:

  • Simple VBS Script to printout the AD information
  • Text file output to the same folder the script was run from…
  • I’ve slightly tweaked this script to make the output data more easy on the eyes.

Continue reading

“Netlogon” Folder Structure

Not really a Fix, just to maintain my consistancy when setting up servers “Netlogon” dir.

Netlogon

Logon_Software
* ip.bat
* bginfo.exe

Logon_Scripts_*LOCATION*
* Location*_Logon_Script_*DEPT1*.bat
* Location*_Logon_Script_*DEPT2*.bat
* Location*_Logon_Script_*DEPT3*.bat

Logon_Scripts_*LOCATION2*

Logon_Scripts_GLOBAL
* Global_Logon_Script.bat
* Global_Logon_Script.vbs
* Global_Power_Saving_Profile.bat

Logon_Desktop_Backgrounds
* admin_background.vbs
* admin_background.bgi
* staff_background.vbs
* staff_background.bgi