Category Archives: Windows Server 2003

TS/RDS Disconnect Sessions GP

  • Start -> Run -> gpedit.msc
  • Open Computer Configuration -> Administrative Templates -> Windows Components -> Terminal Services – > Session.

Set time limit for disconnected sessions

  • You can use this setting to specify the maximum amount of time that a disconnected session is kept active on the server. By default, Terminal Services allows users to disconnect from a remote session without logging off and ending the session.

Sets a time limit for active Terminal Services session

  • You can use this setting to specify the maximum amount of time a Terminal Services session can be active before it is automatically disconnected.

Sets a time limit for active but idle Terminal Services session

  • You can use this setting to specify the maximum amount of time that an active session can be idle (that is, no user input) before it is automatically disconnected.

Allow reconnection from original client only

  • Specifies whether to allow users to reconnect to a disconnected Terminal Services session using a computer other than the original client computer.

Terminate session when time limits are reached

  • Specifies whether to terminate a timed-out Terminal Services session instead of disconnecting it.
WSUS (wuauclt.exe) | Updates CLI

Detectnow Option

Because waiting for detection to start can be a time-consuming process, an option has been added to allow you to initiate detection right away. On one of the computers with the new Automatic Update client installed, run this at command prompt:

wuauclt.exe /detectnow

Resetauthorization Option

WSUS uses a cookie on client computers to store various types of information, including computer group membership when client-side targeting is used. By default this cookie expires an hour after WSUS creates it. If you are using client-side targeting and change
group membership, use this option in combination with detectnow to expire the cookie, initiate detection, and have WSUS update computer group membership.

Note that when combining parameters, you can use them only in the order specified as follows:

wuauclt.exe /resetauthorization /detectnow

Windows Server Update Services (WSUS) Support Tools:

CLI for WUAUCLT:

Source: http://technet.microsoft.com/en-us/library/cc708617(WS.10).aspx

Check Action Sessions & disconnect on TS via CMD

Run the following on any Server in the domain from CMD.

  • query session /server:servername

You can then close the sessions by running the following:

  • reset session [ID] /server:servername

This e-mail and any attachments are intended for the addressee only and may=
be confidential. If you are not the intended recipient, please advise the =
sender as soon as practicable and delete the e-mail from the system. The Un=
iversity of Chichester is a company
limited by guarantee, registered in England and Wales. Registration number=
4740553. The registered office is College Lane, Chichester, West Sussex, P=
O19 6PE.

Add Network Printer via VBS

Use the script below to add a network printer, you can simply dump this into a txt file, rename to a .VBS and change the printer addresses (these need to be shared of course!)
The last bit of code should stop the “Error: 8007007B – the filename, directory name, or volume label syntax is incorrect” as it will keep retrying the connection to the printer share if the network is slow and timming out etc.

Last bit is to drop the script into the DC netlogon and add to group policy! BAMM!


Dim net
Set net = CreateObject("WScript.Network")
net.AddWindowsPrinterConnection "\\server\printer"
net.SetDefaultPrinter "\\server\printer"

MapPrinter "\\server\printer"

Sub MapPrinter(strPrinter)
On Error Resume Next
Set objNetwork = CreateObject("WScript.Network")
boolConnected = False
intAttempts = 1
While boolConnected = False And intAttempts <= 5
Err.Clear
objNetwork.AddWindowsPrinterConnection strPrinter
If Err.Number <> 0 Then
intAttempts = intAttempts + 1
WScript.Sleep 2000
Else
boolConnected = True
End If
Wend
End Sub

FSEXTEND.EXE (Diskpart)

After performing the “diskpart extend” command to merge two partitions the new partition will display in disk management however will not show the full capacity. This is a known problem if the command was run without sufficient system resources.
The partition size is extended, but the file system remains the original size when you extend an NTFS volume” – Unfortunately Microsoft have pulled the original “KB832316” (As of 2021) so there is limited information available. There are some references for diskpart here: KB325590

The following method of fixing this with the diskpart tool may work for some (but not others)

diskpart
list volume
select volume X
extend filesystem

If like me you received the following error “Diskpart failed to extend the volume. Please make sure the volume is valid for extending” then there is a 99% this method will not work, in this case you can use the FSEXTEND.EXE tool, after burning around the net and looking at the following EE article it seems that getting hold of the tool is another problem. I resolved this by 45minutes of talking to Microsoft and getting a case open… but to avoid this I’ve uploaded the tool…

Trying to get FSEXTEND.EXE ?

How to Use:

The FSExtend tool really is a “one trick pony” if you try to get the switches required by the program it will simply return with “usage: fsextend.exe driveLetter” so you just need to perform the following:

DISKPART> select volume 1
DISKPART> extend filesystem
DiskPart successfully extended the file system on the volume.
DISKPART> exit
Leaving DiskPart...

List all AD users & email addresses

Simply put this into the Start -> Run bar and hit enter! to get a print out of users & email addresses within the domain.

  • cmd /c dsquery.exe * -limit 0 -filter “(&(objectCategory=person)(objectClass=user)(mail=*))” -attr name mail >”c:\PrimaryEmailAddresses.txt”
  • cmd /c csvde.exe -r “(&(objectCategory=person)(objectClass=user)(mail=*))” -l name,mail -f “c:\PrimaryEmailAddresses.csv”

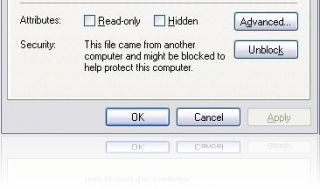
“This file came from another computer and might be blocked to help protect this computer”

OK, this option is simple to deal with:

  1. Right click the file
  2. Select “Unblock”
  3. Run the Application (*.exe)

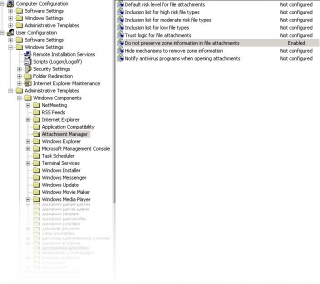
If you don’t want this option to keep coming up just change the following Group Policy setting:

  1. gpedit.msc
  2. User Configuration > Administrative Templates > Windows Components > Attachment Manager
  3. Enable: Do not preserve zone information in file attachments

Add RDP/TS users for remote Access Local Security Permissions (Non Domain Controller)

Make sure that the Remote Desktop Users group has sufficient permissions to log on through Terminal Services.

  1. Click Start, click Run, type secpol.msc, and then click OK.
  2. Expand Local Policies, and then click User Rights Assignment.
  3. In the right pane, double-click Allow logon through Terminal Services. Make sure that the Remote Desktop Users group is listed.
  4. Click OK.
  5. In the right pane, double-click Deny logon through Terminal Services. Make sure that the Remote Desktop Users group is not listed, and then click OK.
  6. Close the Local Security Settings snap-in.

Make sure the user is added to the Remote Desktop Users group:

  1. Open Computer Management.
  2. In the console tree, click the Local Users and Groups node.
  3. In the details pane, double-click the Groups folder.
  4. Double-click Remote Desktop Users, and then click Add….
  5. On the Select Users dialog box, click Locations… to specify the search location.
  6. Click Object Types… to specify the types of objects you want to search for.
  7. Type the name you want to add in the Enter the object names to select (examples): box.
  8. Click Check Names.
  9. When the name is located, click OK.

Check the users or groups to Terminal Services RDP permissions:

  1. Open Terminal Services Configuration.
  2. In the Connections folder, right-click RDP-TCP.
  3. Click Properties.
  4. On the Permissions tab, click Add, and then add the desired users and =
    groups.

Task Scheduler Disk Defragmenter

  1. Open Control Panel
  2. Double-click Scheduled Tasks
  3. Double-click Add Scheduled Task
  4. On the Scheduled Task Wizard dialog, click Next
  5. Click Browse
  6. In the Select Program to Schedule dialog, navigate to the windows\system32 folder
  7. Select defrag.exe
  8. Click Open
  9. In the Scheduled Task Wizard dialog, type a name for the scheduled task (Disk Defragmenter, for instance)
  10. Under Perform this task, select how often you wish Disk Defragmenter to run
  11. Click Next
  12. Set the time at which you wish the Disk Defragmenter scheduled task
    to run. This should be a time when your computer is on, but not in
    heavy use.
  13. Select the frequency at which you want the Disk Defragmenter
    scheduled task to run (Every Day, Weekdays, or Every days, where
    is the number of days between scheduled runs)
  14. Click Next
  15. Enter a user name under which the Disk Defragmenter scheduled task
    will run. Note: This user must be an administrator on the local
    machine.
  16. Enter the password for the user you entered in the previous step
  17. Confirm the password for the user
  18. Click Next
  19. Check Open advanced properties for this task when I click Finish
  20. Click Finish
  21. In the Run text box, you should see the full path and command for
    defrag.exe. By default, this path is C:\WINDOWS\SYSTEM32\defrag.exe
  22. Append the drive letter for the drive you wish to defragment to the
    command in the Run text box. In a default installation, your Run
    command will look like this:
    C:\WINDOWS\SYSTEM32\defrag.exe C:
  23. Click OK
  24. In the Set Account Information dialog, enter and confirm the
    password for the user listed in Run as
  25. Click OK

Source: http://support.microsoft.com/kb/555098

Report of all Users and Groups in my AD (DomainUinfo.vbs)

I usually get asked a lot for lists, specifically lists of AD users and members of groups etc. There are a couple of methods to obtain this…

Output user list in txt format using CMD:

  • net user /domain > C:users.txt (Only Lists Logon Usernames / no OU or Group Info)

Output user list in .txt format (more detail) using VBS:

  • Simple VBS Script to printout the AD information
  • Text file output to the same folder the script was run from…
  • I’ve slightly tweaked this script to make the output data more easy on the eyes.

Continue reading

“Netlogon” Folder Structure

Not really a Fix, just to maintain my consistancy when setting up servers “Netlogon” dir.

Netlogon

Logon_Software
* ip.bat
* bginfo.exe

Logon_Scripts_*LOCATION*
* Location*_Logon_Script_*DEPT1*.bat
* Location*_Logon_Script_*DEPT2*.bat
* Location*_Logon_Script_*DEPT3*.bat

Logon_Scripts_*LOCATION2*

Logon_Scripts_GLOBAL
* Global_Logon_Script.bat
* Global_Logon_Script.vbs
* Global_Power_Saving_Profile.bat

Logon_Desktop_Backgrounds
* admin_background.vbs
* admin_background.bgi
* staff_background.vbs
* staff_background.bgi