Configuring Wifi SSID/PSK on Raspberry Pi (Headless)

Method for configuring Wifi SSID / PSK on Raspberry Pi (Headless)

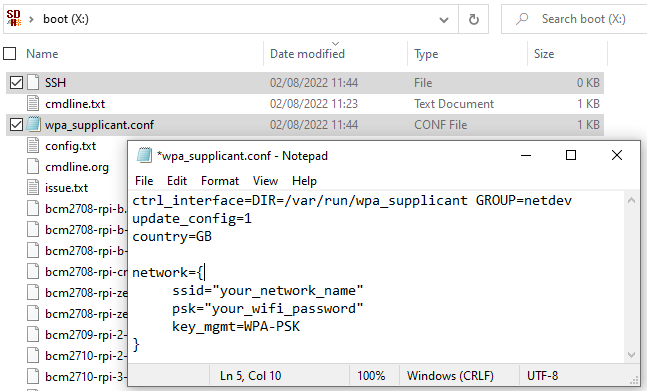
  1. Create “SSH” file (no extension) in SD card root
  2. Create “wpa_supplicant.conf” file with config below
  3. Insert SD card into Raspberry Pi and reboot – BOOM job done.
ctrl_interface=DIR=/var/run/wpa_supplicant GROUP=netdev
update_config=1
country=GB

network={
     ssid="your_network_name"
     psk="your_wifi_password"
}

Windows 10 | Stubborn Account Lockouts

Issue: User account is constantly getting locked out, Credential Manager shows no cached passwords. There are situations where the NT LOCAL SYSTEM context stores passwords that are not visible in Credential Manager view

Resolution (Requires PSExec Tool): 

  1. Run: 
    psexec -i -s -d cmd.exe
  2. Run:
    rundll32 keymgr.dll,KRShowKeyMgr
  3. Different Credential Manager view is displayed (Running under SYSTEM context)
  4. Remove any entry that is present on this list.

Syntax: 

-i = Run the program so that it interacts with the desktop of the specified session on the remote system.

-s = Run remote process in the System account.

-d = Don’t wait for application to terminate. Only use this option for non-interactive applications.

HomeAssistant | Corrupted home-assistant_v2.db | Missing Energy History

My Problem:

Being a stats geek I was very disappointed after noticing that the HomeAssistant energy dashboard was missing some key information, the pretty little bar charts (Including all the history data with them). I could only see the previous few days worth of stats and nothing prior to this.

Some Home Assistant Info… 

All entries in HomeAssistant are dumped into an SQLite DB file (By default) home-assistant_v2.db This file holds short term data (Which is purged every 10days by default) and long term “energy” data which makes up my colourful little charts. 

When something goes bad with the home-assistant_v2.db file HomeAssistant will automatically recreate the file. When it recreates this file all your long term energy data goes “poof” with it in a black hole (Yeah don’t worry you just lost 18months of stats) The auto recreation has some pros and cons….

Pro: it get the system working again

Cons: If you don’t check your energy data daily to see missing stats then you can’t fix the issues without loosing stats.

My Setup…

I’m running UNRAID server with Docker Images, HomeAssistant Core edition (using the default SQLite DB) with external docker containers tied in (It’s not that bad without HA supervisor but it does add my pain when all the guides keep referencing supervisor config/guides). I’m a Windows fan boy and really don’t have much knowledge (or interest) typing Linux commands and CLI in when I could be looking at a GUI to click.

My issue…

After spotting the missing data (after 5 days!). I thought OK, backup restore! Pull the home-assistant_v2.db file from a backup (Daily scheduled automation for HA backup) and simply continue working… partly correct. The restored DB file worked but become corrupted again at 04:12 when the purge job kicks in. This resulting in a corrupted .db file, a new .db file being created and my pretty bar charts to be lost again (Groundhog Day) The DB errror can be seen in the home-assistant.log here:

2023-08-14 04:12:05.386 ERROR (Recorder) [homeassistant.components.recorder.util] Error executing query: (sqlite3.DatabaseError) database disk image is malformed
[SQL: UPDATE states SET old_state_id=? WHERE states.old_state_id IN (?, ?, ?, ?, ?, ?, ?, ?, ?, ?, ?, ?, ?, ?, ?, ?, ?, ?, ?, ?, ?, ?, ?, ?, ?, ?, ?, ?, ?, ?, ?, ?, ?, ?, ?, ?, ?, ?, ?, ?, ?, ?, ?, ?, ?, ?, ?, ?, ?, ?, ?, ?, ?, ?, ?, ?, ?, ?, ?, ?, ?, ?, ?, ?, ?, ?, ?, ?, ?, ?, ?, ?, ?, ?, ?, ?, ?, ?, ?, ?, ?, ?, ?, ?, ?, ?, ?, ?, ?, ?, ?, ?, ?, ?, ?, ?, ?, ?, ?, ?, ?, ?, ?, ?, ?, ?, ?, ?, ?, ?, ?, ?, ?, ?, ?, ?, ?, ?, ?, ?, ?, ?, ?, ?, ?, ?, ?, ?, ?, ?, ?, ?, ?, ?, ?

sqlite3.DatabaseError: database disk image is malformed

2023-08-14 04:12:05.410 ERROR (Recorder) [homeassistant.components.recorder.util] The system will rename the corrupt database file //config/home-assistant_v2.db to //config/home-assistant_v2.db.corrupt.2023-08-14T14:08:05.410328+00:00 in order to allow startup to proceed

After reading forum posts I found that although the DB work it was “malformed” which HA don’t like however it can be fixed…

Continue reading

Gmail POP3 Setup in Outlook Desktop using Google “App Password”

In order to use the old school method of POP3 (Yes there are some crazy systems still using this) you need to use a different one time password which bypasses the two factor authentication… The tricky part is where to find this setting!

  1. Google Security
  2. “2-Step Verfication” (Scroll to the bottom)
  3. “App Passwords” (Generate a specific password for POP3 (Or any other service needed)

Screenshot showing where to locate the App Password settings for POP3 configuration in Outlook

Saving Windows Disk Space | Windows System Cleanup

Although nowadays HDD space is a cheap commodity there is always a Windows C:\ running somewhere with a partition that is busting at the seams and ready to explode. I’ve seen it too many times…

As there are a number of common culprits for these space eating monsters I’m going to post the fixes here in one sweet spot, the “Windows System Cleanup” post.

Windows “Hiberfil.sys”

Hibernate mode uses the hiberfil.sys file to store the current state (memory) of the PC on the hard drive and the file is used when Windows is turned back on.
Always a cause of taking up C:\ the easiest option is to switch it off. Use the following command line to disable:

Enter "powercfg.exe -h off"

Pagefile.sys is a windows system file used as a swap file and was designed to improve performance. Windows uses it as memory location in case the application you’re running ends up needing more RAM than you actually have. This file is stored on the C:\ root but can take up space. Best option is to move it or reduce it (Reducing isn’t really a recommended option)

  1. Right click on ‘PC’.
  2. Left click on ‘Properties’.
  3. Left click on ‘Advanced system configuration’.
  4. If needed, left click on ‘OK’.
  5. Select ‘Advanced options’ tab.
  6. Left click on ‘Configuration’ inside ‘Throughput’.
  7. Select ‘Advanced options’ tab.
  8. Left click on ‘Change’ inside ‘Virtual memory’.
  9. Edit your preferences.
  10. Close all the opened windows by accepting.

Windows “Search” Folder

?

Windows “WINSXS” Folder

Reference this post: Saving Windows Disk Space | Reducing Size of WINSXS folder | Server 2008 R2

Windows Shadow Copies

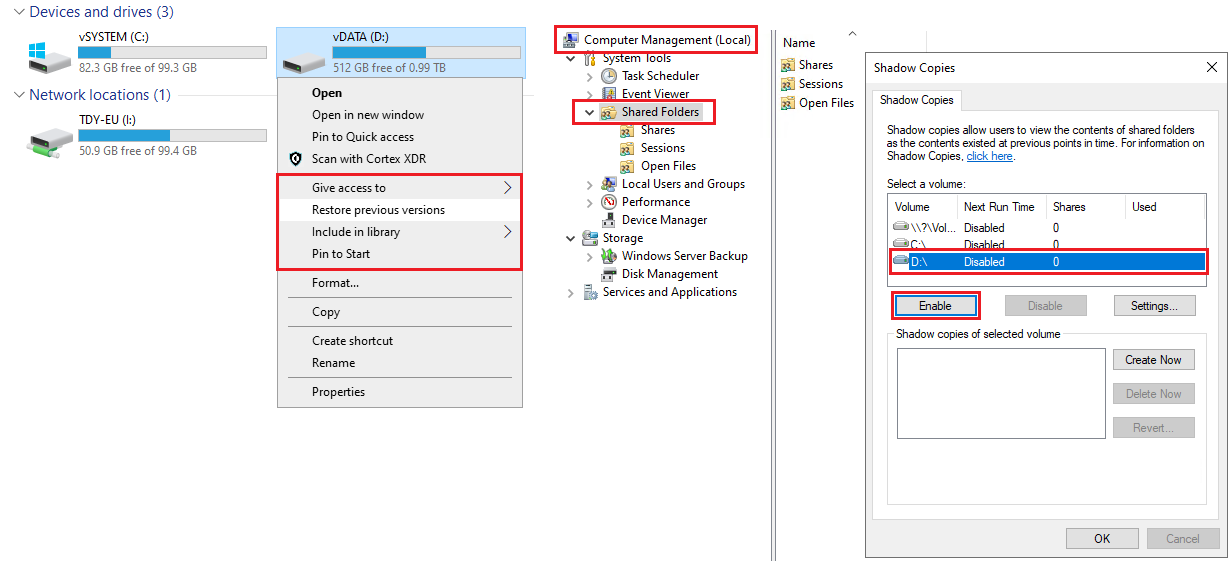
Shadow copies take up space in C:\System Volume Information (Hidden Folder) They can be reduced or completely deleted using VSSAdmin

Shows Shadow Copy Versions:

vssadmin list shadowstorage

Deletes all Shadow Copies:

vssadmin delete shadows /all

BranchCache “PeerDistRepub” folder

BranchCache is basically a cached version of updates from Microsoft. Folder can be flushed/cleared using netsh
Check Cache

netsh branchcache show status all

Flush Cache

netsh branchcache flush

Uninstall BranchCache Feature (PowerShell)

Uninstall-WindowsFeature Branchcache

Windows Spotlight Background | Image not rotating/changing

Windows Spotlight Background/Image not rotating correctly? My Windows 10 background image was stuck on the same photo. Windows’ Content Delivery Manager should change the image every 1-2 days.

Delete Spotlight Assets

Delete all files in the image location:

“%USERPROFILE%/AppData\Local\Packages\Microsoft.Windows.ContentDeliveryManager_cw5n1h2txyewy\LocalState\Assets”

Reset Windows Spotlight Settings

Delete the settings.dat and roaming.lock files in the setting location:

“%USERPROFILE%/AppData\Local\Packages\Microsoft.Windows.ContentDeliveryManager_cw5n1h2txyewy\Settings”

After removing the files spotlight should appear blank until after a reboot.

VMware, ESX | CLI Cheatsheet

Quick guide / cheatsheet with various ESXCLI commands specifically for ESX 7.0+

Enter maintenance mode:

esxcli system maintenanceMode set --enable true

Exit maintenance mode:

esxcli system maintenanceMode set --enable false

Restart management agents “ESXi host daemon” and “vCenter Agent” services:

/etc/init.d/hostd restart
/etc/init.d/vpxa restart

Restart management agents “All”:

services.sh restart

Reboot Host:

esxcli system shutdown reboot --reason Upgrades

Reference: 

Restarting the Management agents in ESXi (1003490) (vmware.com)

APC UPS | Management Card

Rebooting APC/UPS management card

  • Method 1: Using Web interface under “Administration->General->Reset/Reboot->Reboot Management”
  • Method 2: Using Putty (SSH) Session using “reboot” command.
  • Method 3: Physically pressing the “reset” button on the management card

Raspberry Pi Zero 2 W | Headless Setup | WIFI Config

Quick steps (Cutdown version) to getting WiFi configured on Raspberry Pi Zero W (A little more involved than using Raspberry Pi 2/3/4 with physical ethernet cables)

    • Flash the MicroSD card with your flavour of OS.
    • Add file called “SSH” no extension
    • Add file called “wpa_supplicant.conf” and modify the info

ctrl_interface=DIR=/var/run/wpa_supplicant GROUP=netdev
update_config=1
country=GB

network={
ssid=”your_network_name”
psk=”your_wifi_password”
}

    • Insert MicroSD into Raspberry Pi Zero & Boot
    • The IP address can be found from DHCP table OR using an app to scan the network such as “Network Analyser

Continue reading

VMware “TPM 2.0 device detected” | Dell PowerEdge

When deploying new ESX (v7.0.2 Ud) on new Dell PowerEdge (R350) server the following message appears after the installation of ESX and adding to vCenter


It appears that you can’t deploy out the box with a TPM tweak in the BIOS to allow clearing this error.
I placed the iDRAC console into “BIOS boot mode” (to save faffing about pressing “F8,F2,F5” keys, whichever one it is) before rebooting.

System BIOS -> System Security | Enable “Intel(R) TXT”

System BIOS -> System Security -> TPM Advanced Settings | Enabled “SHA256”

After a reboot of the host, the error can be cleared back in vCenter

Note: The server is not currently using “Secure Boot”

VMware ESX 7.0.2 | 503 Service Unavailable

Issue with unresponsive ESX host (Running v7.0.2) in vCenter (Shows disconnected), all VMs are still running on the host and can access ESX UI directly (IP/DNS).

Trying to resolve I complete the following:

  • iDRAC to ESX direct console
    • Enable SSH (This provides a backup to access with CLI)

SSH to ESX console and restart management agents

/etc/init.d/hostd restart
/etc/init.d/vpxa restart

After restarting the management agents the ESX GUI becomes inaccessible with the following error: 

503 Service Unavailable (Failed to connect to endpoint: [N7Vmacore4Http16LocalServiceSpecE:0x000000eb77f04cd0] _serverNamespace = / action = Allow _port = 8309)

After some searching on the internet I find this vmware KB: 2144962 which looks promising however… there is no/ui local 8308 redirect allow” in the endpoint.conf file so this doesn’t apply. I also compare the contents of “endpoints.conf” files with another ESX host and they are identical.

cat /etc/vmware/rhttpproxy/endpoints.conf

Double check that all services are running on the ESX host:

/etc/init.d/hostd status
/etc/init.d/vpxa status
/etc/init.d/rhttpproxy status

Both hostd & vpxa status is “stopped” after starting this again and waiting the GUI finally displays (After a few minutes….)

/etc/init.d/hostd start
/etc/init.d/vpxa start

Investigating further with the use of “esxtop” it indicates that the CPU & memory is heavily over commited which is what possibly prevented the “restart” services command from working correctly. The host is currently used at a branch office with only 3 low resource required VMs running. I’ve also seen this same behavior on other high performance ESX hosts which I believe is either related to the build “VMware ESXi, 7.0.2, 17867351” or potentialy the “Dell EMC iDRAC service module v4.2.0.0

After finding a patching window to reboot the host and apply a later build “VMware ESXi, 7.0.2, 18538813” I have yet to experience the same issues.

Note: I’ve also had the same issue whereby I was unable to SSH or GUI into the ESX. In this scenario I ended up having to reboot the host from the iDRAC. Fortunately this was at smaller site locations and RDP to the VMs was still available so they could be cleanly powered down through Windows before a hard reset of ESX.

APC UPS | Unable to login to APC Management

Error when trying to connect to the APC UPS management GUI (This is probably only applicable on the older models and firmware versions, but lets face it there’s a shed load of these older units gathering dust at the bottom of the rack somewhere, they get missed unless they start bleeping!)

“Someone is currently logged into the APC Management Web Server. Please try again later”

Continue reading

Windows | Increase System Partition Size Remotely PS

After increasing a virtual machine VMDK size you need to also resize this partition in Windows.

This can be completed remotely using PowerShell. There are various methods to run this but I prefer to use “Server Management” and admin the machines from here. you can run “PowerShell” on a remote session to run the script below.

This process will increase the C:\ partition to use all space that has been allocated by VMware. (Replace -DriveLetter with the required drive)

There are various methods (this is just one of them) 


Update-HostStorageCache
$size = Get-PartitionSupportedSize -DriveLetter C
Write-Output $size
Resize-Partition -DriveLetter C -Size $size.SizeMax -Verbose
Write-Output "Drive Extension Complete!"

Exit-PSSession

Windows | 3 Methods to “Unauthorised” DHCP server

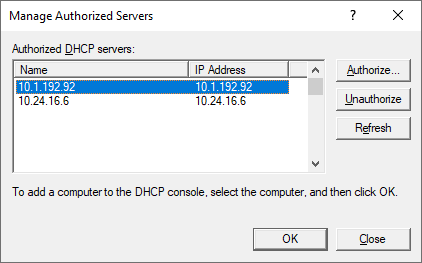
There’s a couple of ways to “unauthorised” a DHCP server in Active Directory. Sometimes AD can get in a twist and says “the DHCP can’t be authorised” as it’s already been authorised. This could be potentially related to replication time but the steps below will help you check.

Via the DHCP MMC GUI -> Right click -> “Manage Authorised Servers”

Via CLI

Show authorised list (basically what you see in the GUI)

Netsh DHCP show server

Remove entry: (Netsh DHCP delete server ServerFQDN ServerIP address)

Netsh DHCP delete server 2003-dc1.contoso.com 10.1.192.92

Via ASDIedit MMC