Category Archives: Code

Any Coding or Hacks to perform a task

Saving Windows Disk Space | Windows System Cleanup

Although nowadays HDD space is a cheap commodity there is always a Windows C:\ running somewhere with a partition that is busting at the seams and ready to explode. I’ve seen it too many times…

As there are a number of common culprits for these space eating monsters I’m going to post the fixes here in one sweet spot, the “Windows System Cleanup” post.

Windows “Hiberfil.sys”

Hibernate mode uses the hiberfil.sys file to store the current state (memory) of the PC on the hard drive and the file is used when Windows is turned back on.
Always a cause of taking up C:\ the easiest option is to switch it off. Use the following command line to disable:

Enter "powercfg.exe -h off"

Pagefile.sys is a windows system file used as a swap file and was designed to improve performance. Windows uses it as memory location in case the application you’re running ends up needing more RAM than you actually have. This file is stored on the C:\ root but can take up space. Best option is to move it or reduce it (Reducing isn’t really a recommended option)

  1. Right click on ‘PC’.
  2. Left click on ‘Properties’.
  3. Left click on ‘Advanced system configuration’.
  4. If needed, left click on ‘OK’.
  5. Select ‘Advanced options’ tab.
  6. Left click on ‘Configuration’ inside ‘Throughput’.
  7. Select ‘Advanced options’ tab.
  8. Left click on ‘Change’ inside ‘Virtual memory’.
  9. Edit your preferences.
  10. Close all the opened windows by accepting.

Windows “Search” Folder

?

Windows “WINSXS” Folder

Reference this post: Saving Windows Disk Space | Reducing Size of WINSXS folder | Server 2008 R2

Windows Shadow Copies

Shadow copies take up space in C:\System Volume Information (Hidden Folder) They can be reduced or completely deleted using VSSAdmin

Shows Shadow Copy Versions:

vssadmin list shadowstorage

Deletes all Shadow Copies:

vssadmin delete shadows /all

BranchCache “PeerDistRepub” folder

BranchCache is basically a cached version of updates from Microsoft. Folder can be flushed/cleared using netsh
Check Cache

netsh branchcache show status all

Flush Cache

netsh branchcache flush

Uninstall BranchCache Feature (PowerShell)

Uninstall-WindowsFeature Branchcache
Windows | Increase System Partition Size Remotely PS

After increasing a virtual machine VMDK size you need to also resize this partition in Windows.

This can be completed remotely using PowerShell. There are various methods to run this but I prefer to use “Server Management” and admin the machines from here. you can run “PowerShell” on a remote session to run the script below.

This process will increase the C:\ partition to use all space that has been allocated by VMware. (Replace -DriveLetter with the required drive)

There are various methods (this is just one of them) 


Update-HostStorageCache
$size = Get-PartitionSupportedSize -DriveLetter C
Write-Output $size
Resize-Partition -DriveLetter C -Size $size.SizeMax -Verbose
Write-Output "Drive Extension Complete!"

Exit-PSSession

Windows | 3 Methods to “Unauthorised” DHCP server

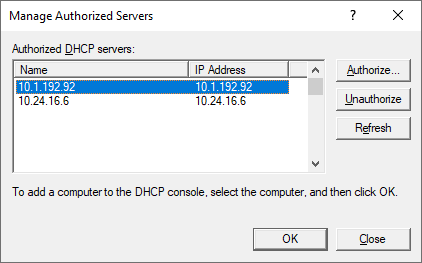
There’s a couple of ways to “unauthorised” a DHCP server in Active Directory. Sometimes AD can get in a twist and says “the DHCP can’t be authorised” as it’s already been authorised. This could be potentially related to replication time but the steps below will help you check.

Via the DHCP MMC GUI -> Right click -> “Manage Authorised Servers”

Via CLI

Show authorised list (basically what you see in the GUI)

Netsh DHCP show server

Remove entry: (Netsh DHCP delete server ServerFQDN ServerIP address)

Netsh DHCP delete server 2003-dc1.contoso.com 10.1.192.92

Via ASDIedit MMC

Windows | DHCP PowerShell Options (Cheatsheet)

Managing DHCP on DHCP server:

Add-WindowsFeature -Name DHCP –IncludeManagementTools

Managing DHCP on remote host:

Add-WindowsFeature RSAT-DHCP

Powershell DHCP Module:

Import-Module DhcpServer

Get all DHCP servers in AD

Get-DhcpServerInDC

Get DHCP scope configuration

Get-DhcpServerv4Scope –ComputerName <DHCPServerName>

Get DHCP reservations on scope:

Get-DhcpServerv4Reservation -ComputerName <DHCPServerName> -ScopeId <ScopeID>

Import/Export DHCP Scopes

netsh dhcp server export C:\temp\DHCP.txt all
netsh dhcp server import C:\temp\DHCP.txt all

Note: The temp folder needs to be created

Check DHCP Replication Failover Status

Get-DhcpServerv4Failover -ComputerName <DHCPServerName>

Reference:
https://technet.microsoft.com/en-us/library/jj590708(v=wps.630).aspx

Windows Dedup | Cheat Sheet

Get dedup status:

Get-DedupStatus

Get dedup status formatted & additional info:

Get-DedupStatus | fl

Get dedup status for specified volumes:

Get-DedupStatus -Volume "D:","F:"

Show Dedup Metadata (How deduplication is being used) on the server:

Get-Dedupmetadata

Show Dedup Metadata for specified volumes:

Get-Dedupmetadata D:

Enable Dedup Job:

Start-DedupJob D: -Type Optimization -Full

Disable Dedup Job:

Start-DedupJob -Type Unoptimization -Volume <Desired-Volume>

Ref: https://docs.microsoft.com/en-us/windows-server/storage/data-deduplication/whats-new

Remove “Windows.old” using Cleanmgr CLI | Windows 10

PowerShell Script for removing the “Windows.old” folder using cleanmgr.exe command line

New-ItemProperty -Path 'HKLM:\SOFTWARE\Microsoft\Windows\CurrentVersion\Explorer\VolumeCaches\Temporary Setup Files' -PropertyType 'DWORD' -Force -Name 'StateFlags1337' -Value 0x2
New-ItemProperty -Path 'HKLM:\SOFTWARE\Microsoft\Windows\CurrentVersion\Explorer\VolumeCaches\Previous Installations' -PropertyType 'DWORD' -Force -Name 'StateFlags1337' -Value 0x2
cleanmgr.exe /SAGERUN:1337

Great post on the syntax of “Cleanmgr.exe”

https://winaero.com/blog/cleanmgr-exe-command-line-arguments-in-windows-10/ 

Migrate Folder Shares | PowerShell

Basic objective, we’ve got a ton of shares which we need to move to a new server. The data has already been replicated but we need to re-share.
There are methods of doing this by exporting the registry but being a little scared of messing up the current shares and requiring a reboot I decided to do this manually…

Export list of shares on source server:

get-WmiObject -class Win32_Share -computer servername.fqdn.com | Export-Csv -Path "C:\Shares.csv"

Create shares on destination server:

Powershell:

Need the powershell command here

CMD Net Share

net share "ShareName"="D:\Path\FolderName" /grant:everyone,FULL

Reference:
https://docs.microsoft.com/en-us/powershell/module/microsoft.powershell.utility/export-csv?view=powershell-6
https://gallery.technet.microsoft.com/scriptcenter/Creates-New-Share-with-fb22d905
http://www.tomsitpro.com/articles/use-fileshare-powershell-cmdlets-server-2016,2-1053.html

VMware ESX 6.0 to 6.5 Upgrade | vSphere CLI commands

I’ve been working on a project to upgrade vCentre from 6.0 to 6.5. This meant that multiple Dell (R530, R630, R730) hosts required an update of ESX (using Update Manager). Unfortunately these upgrades failed (first time around) due to the custom VIBs within previous Dell Customized Images of ESXi conflicting with native drivers within ESX6.5. Below is the cheat-sheet of commands to remove these. 

vSphere CLI commands. These can be executed by enabling SSH on ESX host and connecting via Putty

List VIBs (Matching “QLC”)

esxcli software vib list | grep QLC

List VIBs (All)

esxcli software vib list

List VIBs (Network) (Check you don’t disconnect yourself)

esxcli network nic list

Remove VIBs (example scsi-mtip32xx-scsi)

esxcli software vib remove -n scsi-mtip32xx-scsi

Host Maintenance Mode

esxcli system maintenanceMode set --enable true

Host Reboot (Needs to be in maintenance mode)

esxcli system shutdown reboot --reason Upgrades

Notes: The vSphere CLI has been superseded by PowerCLI. PowerCLI is distributed as a Windows PowerShell snapin (PowerCLI 6.0 introduced PowerShell module), and includes over 500 PowerShell cmdlets for managing and automating vSphere and vCloud, along with documentation and samples. 

Reference: https://docs.vmware.com/en/VMware-vSphere/5.5/com.vmware.vsphere.upgrade.doc/GUID-7FFEBD91-5D82-4E32-93AB-F10D8BFFECAA.html

SQL Firewall Rules | PowerShell

Add Windows Firewall exclusions for Microsoft SQL using PowerShell

Set-ExecutionPolicy -ExecutionPolicy RemoteSigned
#Enabling SQL Server Ports
New-NetFirewallRule -DisplayName “SQL Server” -Direction Inbound –Protocol TCP –LocalPort 1433 -Action allow
New-NetFirewallRule -DisplayName “SQL Admin Connection” -Direction Inbound –Protocol TCP –LocalPort 1434 -Action allow
New-NetFirewallRule -DisplayName “SQL Database Management” -Direction Inbound –Protocol UDP –LocalPort 1434 -Action allow
New-NetFirewallRule -DisplayName “SQL Service Broker” -Direction Inbound –Protocol TCP –LocalPort 4022 -Action allow
New-NetFirewallRule -DisplayName “SQL Debugger/RPC” -Direction Inbound –Protocol TCP –LocalPort 135 -Action allow
#Enabling SQL Analysis Ports
New-NetFirewallRule -DisplayName “SQL Analysis Services” -Direction Inbound –Protocol TCP –LocalPort 2383 -Action allow
New-NetFirewallRule -DisplayName “SQL Browser” -Direction Inbound –Protocol TCP –LocalPort 2382 -Action allow
#Enabling Misc. Applications
New-NetFirewallRule -DisplayName “HTTP” -Direction Inbound –Protocol TCP –LocalPort 80 -Action allow
New-NetFirewallRule -DisplayName “SSL” -Direction Inbound –Protocol TCP –LocalPort 443 -Action allow
New-NetFirewallRule -DisplayName “SQL Server Browse Button Service” -Direction Inbound –Protocol UDP –LocalPort 1433 -Action allow
#Enable Windows Firewall
Set-NetFirewallProfile -DefaultInboundAction Block -DefaultOutboundAction Allow -NotifyOnListen True -AllowUnicastResponseToMulticast True

Windows Server 2016 | Remove WSUS (Completely)

Trying to completely remove WSUS isn’t as straight forward as uninstalling the role.
These steps are based on WSUS using the WID database (Not SQL)

In Summary:

  • Remove Windows Update Servers (WSUS) role & Windows Internal Database (WID)
  • Remove WSUS cache & Update Services directories
  • Remove WSUS website in IIS
  • Reboot

PowerShell:

Uninstall-WindowsFeature -Name UpdateServices,Windows-Internal-Database
Remove-Item –path D:\WSUS, C:\Windows\WID –recurse
Remove-Item –path C:\Users\MSSQL$MICROSOFT##WID
Remove-Item –path C:\Scripts, C:\Temp –recurse

Remove-Item –path C:\Program Files\Update Services –recurse 

Remove-WebSite -Name "WSUS Administration"
Restart-Computer

References: ServerFault

Windows 7 | Delete Offline File Cache CSC Folder

After carrying out a domain migration on a PC the “offline files cache” still retains a local cache for the previous domain.

Within “Offline Files” (Control Panel) there is an option to “Delete temporary files” but this does not remove the “All offline files” cache located in the “C:\Windows\CSC” folder

The workaround to fully remove these files (and start a new offline sync) is to add the “FormatDatabase” registry entry which forces deletion.

This command will add the registry entry. After which reboot the system and all offline files will be removed:

reg add HKLM\SYSTEM\CurrentControlSet\services\CSC\Parameters /v FormatDatabase /t REG_DWORD /d 1

Obtaining local Passwords from Memory Dump

Outputting memory dump of Windows security sessions. (Obtaining passwords stored locally in cache). This can be run against a remote system to obtain password credential information. This requires “local administrator” rights on the remote PC being targeted.

Requires: PsExec & ProcDump

psexec \\computername -accepteula -s -c procdump -accepteula -ma -o lsass.exe \\server\logs\computername.log

Reference: https://cyberarms.wordpress.com/2015/03/16/grabbing-passwords-from-memory-using-procdump-and-mimikatz/

iPhone Video Rename by Date/Time EXIF Values | Cheatsheet

I always like to copy the video’s off my iPhone onto my PC and then resync them back to the phone (selecting only the ones I want) unfortunately this process isn’t always straight forward when you also want to rename them using their EXIF date & time values. As you may already know EXIF date works great with JPGs but there doesn’t seem to be so much of a “standard” when it comes to EXIF data for videos. The resync back to iPhone sometimes causes the incorrect date/time stamp in the Camera Roll. This really bothers me during iMovie creations because I like to reference (and know by the title) when the clip was created. Fortunately when the iPhone camera creates video files it also injects EXIF data (When using the native App). This is a great reference when you want to date/time rename the files but can be confusing when video files contain over 20 EXIF values all specifically related to date/time.

Continue reading

JumboFrames Test / Command Line

I usually configure JumboFrames on iSCSI devices. The quickest way to do this is with a direct Ethernet cable from iSCSI to Server (Configuring seperate LAN IPS for both devices)
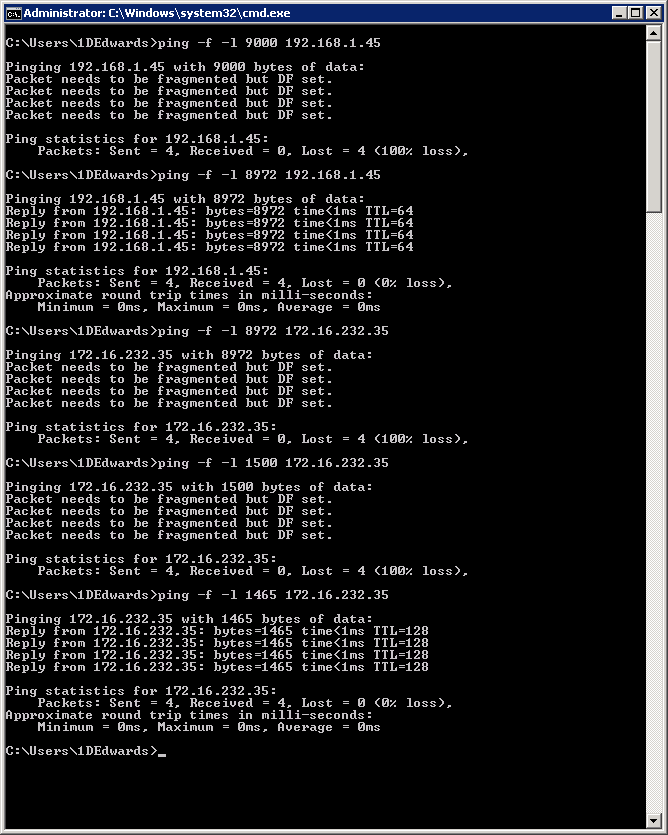
To test that JumboFrames is enabled on the network cards I use the PING method and modify the frame size. Default packet sizes are 1500bytes (MTU).

192.168.1.45 (Is configured for Jumbo Frames) – Althought the Jumboframe MTU is 9000bytes there are some overheads in the packets therefore you need to use an MTU of 8972bytes

172.16.232.35 (Is NOT configured for Jumbo Frames) – You can see below the packets fail with “Packet needs to be fragmented but DF set

DNS | Modify DNS entry CMD

Add/Remove a DNS record without the GUI

Add

dnscmd [ServerName] /recordadd [ZoneName] [NodeName] RRType&gt; &lt;RRData]
dnscmd UK-WDC01 /RecordAdd edwardsd.local UK-ESX01 A 192.168.1.5

Delete

dnscmd &lt;ServerName&gt; /recorddelete &lt;ZoneName&gt; &lt;NodeName&gt; &lt;RRType&gt; &lt;RRData&gt;[/f]
dnscmd UK-WDC01 /recorddelete edwardsd.local UK-ESX01 A 192.168.1.5

Reference: DNSCMD Examples

Windows Commands | Powershell

A few random PowerShell commands in Windows to help complete tasks:

Create New AD User:

New-ADUser -SamAccountName U1 -Name "User 1" -AccountPassword (ConvertToSecureString -AsPlainText "p@ssw0rd" -Force) -Enabled $true -Path 'OU=Test,DC=FABRIKAM,DC=COM'

Displays if “Desktop Experience” is installed:

Get-WindowsFeature *Desktop*

Installs “Desktop Experience” Feature:

Add-WindowsFeature Desktop-Experience

Remove Windows Patches

wusa /uninstall /kb:2952664

Clear all log entries
Although previous logs in event viewer can be helpful for diagnostics, I find old errors sometime cloud the current issues. In order to quickly clear all evertvwr logs entries you can use the following powershell command

wevtutil el | Foreach-Object {Write-Host "Clearing $_"; wevtutil cl "$_"}

Bypass code Execution

Usually if you get this error “PowerShell says “execution of scripts is disabled on this system.” the quick option is to bypass the execution policy:

Set-ExecutionPolicy Unrestricted

Disable Java Update | Windows

Quickest solution to stop this annoying update prompt is to use this regedit and which modifies the “Update” DWORD.
This update prompt is even more annoying if the user does not have local administrator rights.

Windows Registry Editor Version 5.00

[HKEY_LOCAL_MACHINE\SOFTWARE\Wow6432Node\JavaSoft\Java Update\Policy]

"EnableJavaUpdate"=dword:00000000
"EnableAutoUpdateCheck"=dword:00000000