Category Archives: Software

Any software, just for easy download reference!

Saving Windows Disk Space | Windows System Cleanup

Although nowadays HDD space is a cheap commodity there is always a Windows C:\ running somewhere with a partition that is busting at the seams and ready to explode. I’ve seen it too many times…

As there are a number of common culprits for these space eating monsters I’m going to post the fixes here in one sweet spot, the “Windows System Cleanup” post.

Windows “Hiberfil.sys”

Hibernate mode uses the hiberfil.sys file to store the current state (memory) of the PC on the hard drive and the file is used when Windows is turned back on.
Always a cause of taking up C:\ the easiest option is to switch it off. Use the following command line to disable:

Enter "powercfg.exe -h off"

Pagefile.sys is a windows system file used as a swap file and was designed to improve performance. Windows uses it as memory location in case the application you’re running ends up needing more RAM than you actually have. This file is stored on the C:\ root but can take up space. Best option is to move it or reduce it (Reducing isn’t really a recommended option)

  1. Right click on ‘PC’.
  2. Left click on ‘Properties’.
  3. Left click on ‘Advanced system configuration’.
  4. If needed, left click on ‘OK’.
  5. Select ‘Advanced options’ tab.
  6. Left click on ‘Configuration’ inside ‘Throughput’.
  7. Select ‘Advanced options’ tab.
  8. Left click on ‘Change’ inside ‘Virtual memory’.
  9. Edit your preferences.
  10. Close all the opened windows by accepting.

Windows “Search” Folder

?

Windows “WINSXS” Folder

Reference this post: Saving Windows Disk Space | Reducing Size of WINSXS folder | Server 2008 R2

Windows Shadow Copies

Shadow copies take up space in C:\System Volume Information (Hidden Folder) They can be reduced or completely deleted using VSSAdmin

Shows Shadow Copy Versions:

vssadmin list shadowstorage

Deletes all Shadow Copies:

vssadmin delete shadows /all

BranchCache “PeerDistRepub” folder

BranchCache is basically a cached version of updates from Microsoft. Folder can be flushed/cleared using netsh
Check Cache

netsh branchcache show status all

Flush Cache

netsh branchcache flush

Uninstall BranchCache Feature (PowerShell)

Uninstall-WindowsFeature Branchcache

VMware, ESX | CLI Cheatsheet

Quick guide / cheatsheet with various ESXCLI commands specifically for ESX 7.0+

Enter maintenance mode:

esxcli system maintenanceMode set --enable true

Exit maintenance mode:

esxcli system maintenanceMode set --enable false

Restart management agents “ESXi host daemon” and “vCenter Agent” services:

/etc/init.d/hostd restart
/etc/init.d/vpxa restart

Restart management agents “All”:

services.sh restart

Reboot Host:

esxcli system shutdown reboot --reason Upgrades

Reference: 

Restarting the Management agents in ESXi (1003490) (vmware.com)

Obtaining local Passwords from Memory Dump

Outputting memory dump of Windows security sessions. (Obtaining passwords stored locally in cache). This can be run against a remote system to obtain password credential information. This requires “local administrator” rights on the remote PC being targeted.

Requires: PsExec & ProcDump

psexec \\computername -accepteula -s -c procdump -accepteula -ma -o lsass.exe \\server\logs\computername.log

Reference: https://cyberarms.wordpress.com/2015/03/16/grabbing-passwords-from-memory-using-procdump-and-mimikatz/

Trent AV | Tools & Commands

Transferring Trend OfficeScan Client from One Trend Console to Another

\\TrendAV01.domain.com\ofcscan\Admin\Utility\IpXfer\ipxfer.exe -s TrendAV01.domain.com -m 1 -p 8080 -c 49831

Transferring Trend OfficeScan Client from One Trend Console to Another REMOTELY

Download PSEXEC and copy to to C:\Windows\System32

psexec \\LaptopName -u Domain\ADMUSER -p Passw0rd -i "\\TrendAV01.domain.com\Trend_Antivirus\Tools\TrendClientMove_x86.bat"

TrendClientMove_x86.bat

@ECHO OFF
REM Modifies Trend Update Policy Server to use TRENDAV01.domain.com
\\TrendAV01.domain.com\ofcscan\Admin\Utility\IpXfer\ipxfer.exe -s TrendAV01.domain.com -m 1 -p 8080 -c 49831
Echo Update is now Complete!
Echo Click to Close 
Pause

TrendClientMove_x64.bat

@ECHO OFF
REM Modifies Trend Update Policy Server to use TRENDAV01.domain.com
\\TrendAV01.domain.com\ofcscan\Admin\Utility\IpXfer\ipxfer.exe -s TrendAV01.domain.com -m 1 -p 8080 -c 49831
Echo Update is now Complete!
Echo Click to Close 
Pause

Reseting OfficeScan Password:

Reference: Reset Officescan Password

Trend Uninstall Tools:

Disable Java Update | Windows

Quickest solution to stop this annoying update prompt is to use this regedit and which modifies the “Update” DWORD.
This update prompt is even more annoying if the user does not have local administrator rights.

Windows Registry Editor Version 5.00

[HKEY_LOCAL_MACHINE\SOFTWARE\Wow6432Node\JavaSoft\Java Update\Policy]

"EnableJavaUpdate"=dword:00000000
"EnableAutoUpdateCheck"=dword:00000000

Veeam Backup | Benchmarks

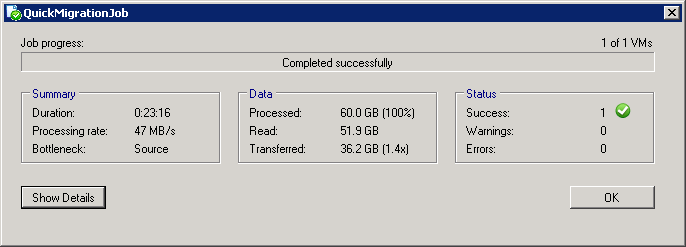
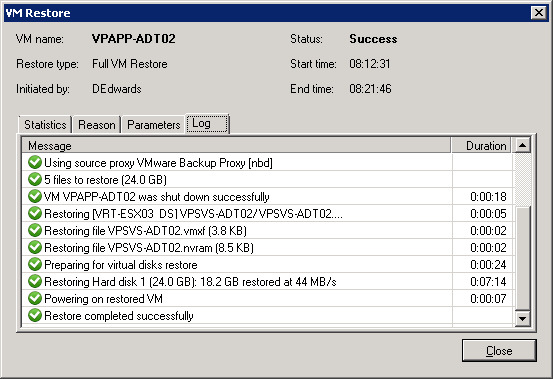
I’ve been using VMWare converter and Veeam Replication for a while now but still ask myself the question of “How long will this take to migrate or P2V”

Here’s some results to help with the expected performance…

1 VM Move – Server to Server on LAN (1GBPS Switch)

1 VM Restore – Reverse Incremental Backup on iSCSI to Server on LAN (1GBPS Switch)

PSEXEC | Remove File Share Remotely

Sometime it takes time to go and speak to a user, then stop what they are doing so you can make a change or tweak on their PC/Laptop so I like to do this in the background remotely without their knowledge (Hey! I’m an Admin that’s what I do)

PSEXEC has become a good friend for doing this!
I usually dump the “psexec” exe in the c:\Windows\System32 folder so I don’t have to change CMD paths. (Remember you need to run CMD as the user with access to the remote system for this to work)

Remove Share Remotely:

psexec \\PCNAME net share <SHARENAME> /delete

Map Drive Remotely:

psexec \\PCNAME net use S: \\SERVER\SHARE

VMware | “You cannot use the vSphere Client to edit the settings”

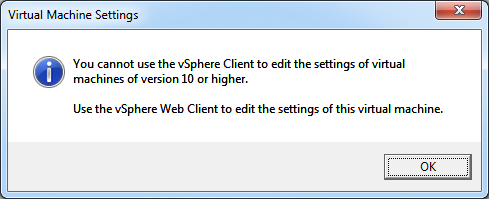
After carrying out a re-install of ESXi 5.5 and attaching the VMs the “edit settings” are unavailable.

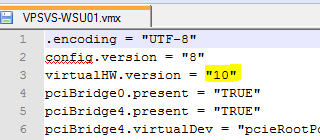
“You cannot use the vSphere Client to edit the settings of the virtual machines of version 10 or higher.

User the vSphere Web Client to edit the settings of this virtual machine”

As vCentre wasn’t in place for this scenario the workaround was to directly edit the VMs .vmx file.

  1. Load vSphere Client
  2. Select VM: “Remove from Inventory”
  3. Select Storage: “Browse Datastore”
  4. Select VM Folder: Locate/Download “.vmx” file (approximately 3/4 KB)
  5. Edit in Notepad
  6. Modify the “virtualHW.version = “10” to “8”
  7. Upload “.vmx” file back to VM Folder
  8. Select “.vmx” and “Add to Inventory”
  9. VM should now be editable.


Formatting Device | “diskpart”

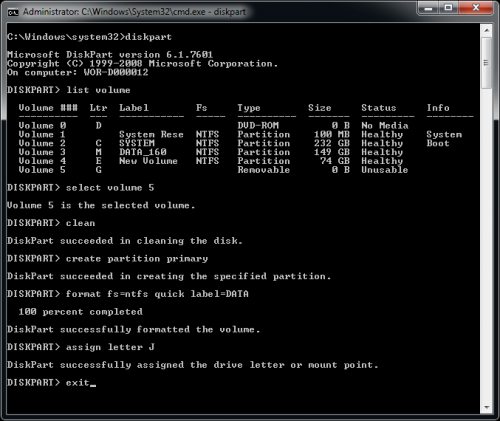
Formatting a USB Flash Drive using the “diskpart” utility:

Diskpart also resolves issues with formatting within Windows GUI:

Error: “Format Cannot Run because the volume is in use by another process” & “Will not format – unknown capacity

CMD

diskpart
list volume
select volume X
clean
create partition primary
format fs=ntfs quick label=DATA
assign letter X

SubACL & iCALCS

SUBINACL (SubInACL.exe)

SubInACL is an alternative command line tool to iCACLS that enables administrators to obtain security information about files, registry keys, and services, and transfer this information from user to user, from local or global group to group, and from domain to domain.

iCACLS

iCACLS example of modifying file permissions:

@echo off
REM ** /T = Performs the operation on all specified files in the current directory and its subdirectories.
REM ** /F = Full Access
REM ** /M = Modify Access
if exist "C:\Program Files (x86)" goto 64
icacls "%ProgramFiles%\Folder" /inheritance:e /grant "MyDomain\Domain Users":M /T
goto next
:64
icacls "%ProgramFiles(x86)%\Folder" /inheritance:e /grant "MyDomain\Domain Users":M /T
next
pause

Show “system uptime” single/multiple servers

“Show uptime of multiple computers” – Looking after multiple servers, I wanted to check which have rebooted and require rebooting due to windows updates. In order to interrogate multiple servers I can use the Sysinternals “PSTools”

Multiple Servers: (Output to txt)

  1. Download PSInfo
  2. Install PSInfo to a chosen location i.e. c:\windows\system32
  3. cmd
psinfo uptime \\* c:\ShowSystemUptimesReport.txt

Uptime = Shows only uptime
\* = checked every pc on the local network

> c:\inventory.txt = Outputs file to this location

Example:

psinfo uptime \\Server-DC1,Server-DC2 > c:\ShowSystemUptimesReport.txt

Single server: (without tools)

systeminfo | find "System Boot Time:"

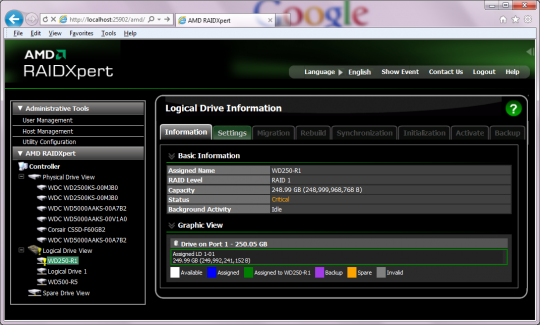
HP Proliant Microserver | AMD RAIDXpert RAID Rebuild

I recently developed a few faults with Windows Server 2008 R2 install running on my HP Proliant Microserver.
A number of posts and articles suggested the fault maybe the result of a faulty HDD therefore I ran a series of disk checks and applications to verify. Unable to locate any faults I opted to remove both 2TB HDDs (configured in RAID1) in order that I could dock them in another workstation and run thought some more thougher checks.
strangely as a result of removing the HDDs the Windows “BSOD” and crashing did stop, however I was still unable to locate any errors on the HDDs.

Rather than installing both HDDs back in the system, I thought it best to only reinstall one HDD in order to fault find, therefore breaking the RAID. Once happy that the fault was correct (Never found out the issue) I started RAID1 rebuild process using the following steps.

Continue reading

Robocopy (FileServer Migration)

I often use Robocopy when migrating/copying data from file servers.

When running the copy process to transfer data from Windows Server 2003 to Windows Server 2008 I usually run robocopy from the destination server (usually the newer server) in order that it will use version XP027 (5.1.10) There are a number of flaws in XP026 and also requires a seperate download Windows 2003 Resource Kit to obtain it.

This is the main syntax I use to perform a full copy.

robocopy D:\Source E:\Destination /MIR /R:1 /W:1 /COPYALL

Example, when copying from another server (using UNC):

robocopy \\myserver\e$\data E:\data /MIR /R:1 /W:1 /COPYALL

Although “/MIR” is mirroring the data, this will not actually copy the ACL permissions, therefore you will need to ensure that /COPYALL is included. I’ve copied a whole load of data before without including this only to find I have had to recopy to correct the ACL.

/COPYALL : Copy ALL file info (equivalent to /COPY:DATSOU) including timescamps, permissions, ACL, other attributes.
/MIR : MIRror a directory tree – equivalent to /PURGE plus all subfolders (/E)
/R:n : Number of Retries on failed copies – default is 1 million.
/W:n : Wait time between retries – default is 30 seconds.

Sometimes the copy may set the top level folder to “hidden” This can be un-hidden using the “attrib” command:

attrib -h -s E:\data

-s : Removes the system file attribute.
-h : Removes the hidden file attribute.

Continue reading

Yamaha RX-V671 | “PCM” Output

I own a Yamaha RX-V671 Amp which my media PC is connected to via HDMI. One of the issues I get is that when playing audio via the HDMI output, the Yamaha amp display shows “PCM” when I need this to display “Dolby Digital” or “DTS”.

In layman’s terms Pulse Code Modulation (PCM) is a digital scheme for transmitting analog data. Basically this means that the media PC converts the audio into digital and sends this to the amp to output. My objective is for the media PC to output the audio in the original format and let the Amp do the processing (whereby this should display “Dolby Digital” or “DTS” etc.

One of the main methods for playing Videos on the Media PC is by using Kazaa Codec Pack and Media Player included with the install. A quick way to install this is by using www.ninite.com and selecting “Kazaa Codec” pack.

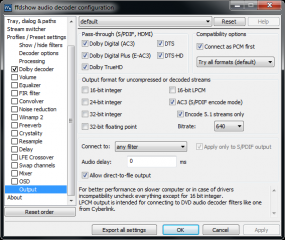
When playing video/audio through Media Player classic, the default installation will output audio via PCM, to correct this, you need to modify the “output” settings on the “FFDShow Audio Decoder Configuration” and enable the “Pass-through” options. The FFDShow icon will display in the taskbar when you play content using it.

Windows & Office Key Activation / Removal

Windows Keys (slmgr):

Change Windows Product Key & Activate:

cmd
slmgr -ipk your-mak-key-here
slmgr -ato

Office Keys (ospp.vbs):

In order to deactivate an Office license you can use the “ospp.vbs” script located in the Office 2010 Installation directory.

This allows for a number of functions, my objective being the deactivation of a activated MAK for Visio & Office 2010.

These are the steps take for this scenario:

CD C:\Program Files\Microsoft Office\Office14

or

CD C:\Program Files (x86)\Microsoft Office\Office14

(32-bit Office 2010 on a 64-bit OS)

Displays a list of Office Product keys installed / Make a note of the Last 5 char of key to be removed:

script ospp.vbs /dstatus

Remove Office Product key activation:

cscript ospp.vbs /unpkey:M9TKQ

HP Proliant Microserver | AMD RAIDXpert Utility Software Download Link

Please can someone tell me WHY is it so HARD to find the DOWNLOAD for “AMD RAIDXpert” ? Makes me so frustrated when you know the software you need (it’s free) but there are so many links and hoops to jump through in order to download it!

As of 2021 there seems to no longer be any valid URLS for “AMD RAIDXpert” hosted by AMD or HP (The HP Microserver “SB7xx/SB8xx Chipset” driver redirects you to a dead AMD page)

I kept a copy of this software to save time searching for it. This is the AMD RAIDXpert Utility URL for the AMD SB7xx/SB8xx Chipset:

AMD RAIDXpert Utility Info:

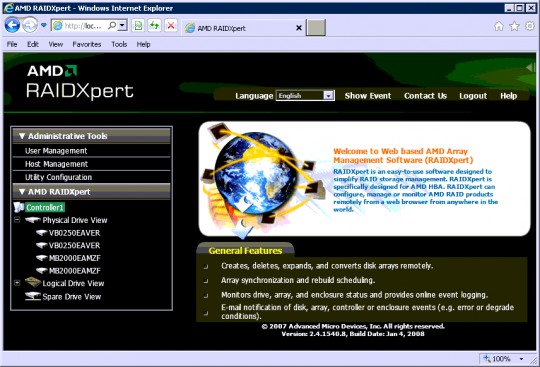
AMD RAIDXpert utility gives you complete control of your RAID arrays within a simple web browser based application. This tool allows you to monitor and manage your RAID arrays in the Microsoft Windows environment or via remote login to your system.

Once installed you can access the application via startmenu shortcut

  • URL: http://localhost:25902/amd/screen.jsp
  • Default Username: admin
  • Default Password: admin

How to Configure AMD RAIDXpert for E-mail Notifications (AMD Direct URL) 


Locating hardware serial number in Windows:

  1. HP Serial number finder or wmic bios get serialnumber

WBAdmin | Daily Backup and Restore via Schedule

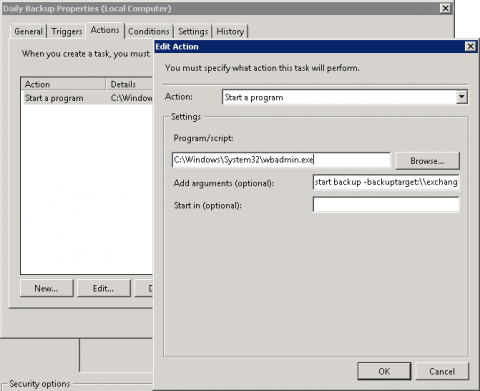
I’ve been working with the windows backup. One downside of this in Windows 2008 is that you can’t schedule a routine backup job to a network device. A work around is use a scheduled task and the WBAdmin tool.

Scheduled Task: (Create a scheduled task and us the following switches)

wbadmin start backup -backuptarget:\\server\backup$\ -vssFull -allCritical -quiet

This command will backup the entire drive including a system image. I don’t think the “allcritical” will work if you then specify items to exclude.

Show Backups Running:

Wbadmin get status

Full list of switches: cc742083

Continue reading

HP Proliant Microserver | Benchmarking

HP Microserver 1: AMD Athlon II Neo N36L 1GB RAM 160GB (P/N: 612275-421)

I finally got round to benchmarking some Graphics cards on the HP Microserver. Although I have not played around with much benchmarking before I thought I would start here as it seems to be a hot topic at present.

My first thoughts were “What do people really want out of the HP Microserver?” – Originally I wanted it as a replacement to my Acer Aspire Revo 3600 and run it as my dedicated HTPC. However this developed through time to become a replacement for my NETGEAR MS2000 Stora NAS while streaming the shares and content to my Acer Aspire Revo 3600 running XBMC.

I was previously using the Negear Stora, but was not satisfied that if the drive failed that I could easily get the data from one of the mirrored disks due to its XFS file system. There are some guides to doing this and I played around with accessing the XFS HDD from a Linux VM but this got quite messy and I had to refer to the good old rule “K.I.S.S.” therefore decided to purchase 2 x 2TB hard drives for the Microserver, RAID1 them and then dump all my media onto here and share using the Dreamspark version of Windows Server 2008 with shared folders. A nice method, however this didn’t allow me to use Streaming Media to my DNLA enabled devices, TV, iPhone, WDTVLive & other Windows 7 Computers.

With the release of Windows Home Server 2011 and dedicated DNLA support I decided I would install this as a VM on top of Windows Server 2008 R2 – 100% NOT SUPPORTED and definately frowned upon by many. But it is all in the name of testing and experimenting with the system. The reason I did this was that in order that I was still able to play around with Hyper-V and Windows Server 2011.

HP Microserver Number 2: AMD Athlon II Neo N36L 1GB RAM 250GB (P/N: 633724)

I recently purchased my 2nd Microserver to play around with Citrix Xen Server and would allow my current Windows Server/Home Server 2011 to stay in one piece. Xen works fine on this box, however I have not put it to the test and only had a limited number of VM’s on the system so will look at the development of this later on.

Following on from my original article I decided to see how well the performance was of the Radeon HD5450 Graphics Card. There has been a lot of talk about whether this card will do a good job as it seemed to be the fastest low profile card (at time of this article) that could be found. To try and improve performance I decided to run with Windows 7 x64 as the base OS, this offered fully supported drivers for all the graphics cards.

Windows 7 was installed on an external HDD and attached using the eSATA connection. A good solution if you don’t want to mess around with the current drives and OS already installed.

I ran through a number of tests on the following cards:

  1. Original Radeon 4200 (This is the onboard graphics card) – VGA with no Audio
  2. PNY Geforce 8400GS (Low Profile PCIe) with Heatsink – HDMI with Audio
  3. Sapphire HD5450 (Low Profile PCIe) with Heatsink – HDMI with Audio

I used the following tools for benchmarking: (There maybe better tools available however as I have only played around with this brief this is what I went with)

  1. Passmark Performance Test 7.0 (Trial Version)
  2. 3D Mark Vantage (Free Basic Version) The latest version of 3D Mark 11 only works with Directx 11 cards.
  3. PC Mark 7 (Free Basic Version)
  4. CPUID (Free)
Although it isn’t a fair test comparing onboard vs a 1GB DDR3 Graphics Card. I was really curious as to how much better the performance actually worked out at. The test results don’t display a massive contrast between cards until the 3D results come into it. Throughout all my testing I have come to conclusion that the HP Microserver still isn’t man enough to handle large 720/108o .MKV video files (I could be doing something wrong?). Running media over a 1GBps network link & even playing content locally I still have performance issues and glitching whereby the same media streams perfectly to my WDTVLive.

Passmark Performance Test Scores

  1. Original Radeon 4200 – Score: 440.9 

    no images were found

  2. PNY Geforce 8400GS – Score: 455.6 

    no images were found

  3. Sapphire HD5450 – Score: 468.7 

    no images were found


3D Mark Vantage

  1. Original Radeon 4200 – Score: TBA
  2. PNY Geforce 8400GS – Score: P435

    no images were found

  3. Sapphire HD5450 – Score: P1091

    no images were found


PC Mark 7

  1. Original Radeon 4200 – Score: 974 
  2. PNY Geforce 8400GS – Score: 994 
  3. Sapphire HD5450 – Score:1034

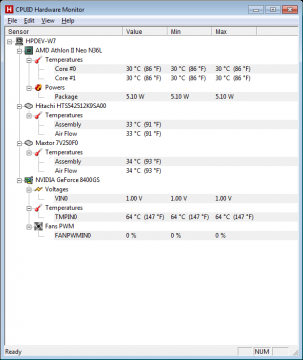
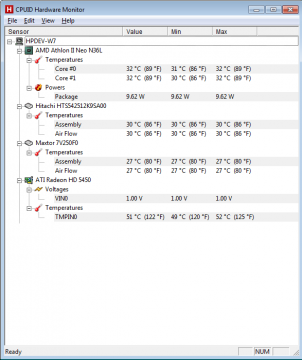
CPUID Temperature Tests

  1. Original Radeon 4200 N/A
  2. PNY Geforce 8400GS 
  3. Sapphire HD5450 

Power Tests:

Another question I always asked myself was whether the Microserver could be left on all day without costing too much and eating up too much power? The results from a electric meter gave a good indication to this and looks similar to leaving a couple of lights on.

Wattage when Idle (GF8400GS Card, 1 x eSATA & 2 x SATA HDD)

no images were found

Wattage when Underload (GF8400GS Card, 1 x eSATA & 2 x SATA HDD)

no images were found