Category Archives: Windows Server 2016

Windows | Increase System Partition Size Remotely PS

After increasing a virtual machine VMDK size you need to also resize this partition in Windows.

This can be completed remotely using PowerShell. There are various methods to run this but I prefer to use “Server Management” and admin the machines from here. you can run “PowerShell” on a remote session to run the script below.

This process will increase the C:\ partition to use all space that has been allocated by VMware. (Replace -DriveLetter with the required drive)

There are various methods (this is just one of them) 


Update-HostStorageCache
$size = Get-PartitionSupportedSize -DriveLetter C
Write-Output $size
Resize-Partition -DriveLetter C -Size $size.SizeMax -Verbose
Write-Output "Drive Extension Complete!"

Exit-PSSession

Adding DNS Alias | Replacing File Server

When replacing a file server with new server and new name you probably want to keep the old name and add a redirect. Originally, I thought this was a simple “change the DNS IP” and job done but there’s a little bit more to it than just that!

1) Locate OLDSERVER entry in DNS and delete it.

2) If the OLDSERVER server AD object still exists, you need to delete it. Failing to remove the old computer object will result in this error:

Unable to add NEWSERVER.
as an alternate name for the computer.
The error is: Cannot create a file when that file already exists.
The command failed to complete successfully.

3) Run this command to add the server alias:

netdom computername NEWSERVER /add:OLDSERVER

Note: if you have subdomains in use (sub.domain.com) then you need to specifically define this overwise the object will add “oldserver.domain.com” rather than “oldserver.sub.domain.com”

4) Register the machine in DNS

IPConfig /RegisterDNS

5) Run this command to check the aliases are shown on the machine

netdom computername NEWSERVER /enum

6) Final check to show what SPF entries have been created:

setspn -l NEWSERVER

Ref: https://support.microsoft.com/en-gb/help/3181029/smb-file-server-share-access-is-unsuccessful-through-dns-cname-alias

Netdom: https://docs.microsoft.com/en-us/previous-versions/windows/it-pro/windows-server-2008-R2-and-2008/cc835082(v=ws.10)

Original Post: https://blogs.technet.microsoft.com/askpfeplat/2017/06/19/using-computer-name-aliases-in-place-of-dns-cname-records/

Windows | DHCP PowerShell Options (Cheatsheet)

Managing DHCP on DHCP server:

Add-WindowsFeature -Name DHCP –IncludeManagementTools

Managing DHCP on remote host:

Add-WindowsFeature RSAT-DHCP

Powershell DHCP Module:

Import-Module DhcpServer

Get all DHCP servers in AD

Get-DhcpServerInDC

Get DHCP scope configuration

Get-DhcpServerv4Scope –ComputerName <DHCPServerName>

Get DHCP reservations on scope:

Get-DhcpServerv4Reservation -ComputerName <DHCPServerName> -ScopeId <ScopeID>

Import/Export DHCP Scopes

netsh dhcp server export C:\temp\DHCP.txt all
netsh dhcp server import C:\temp\DHCP.txt all

Note: The temp folder needs to be created

Check DHCP Replication Failover Status

Get-DhcpServerv4Failover -ComputerName <DHCPServerName>

Reference:
https://technet.microsoft.com/en-us/library/jj590708(v=wps.630).aspx

Windows | Remote Management “Could not start Virtual Disk Service (VDS)”

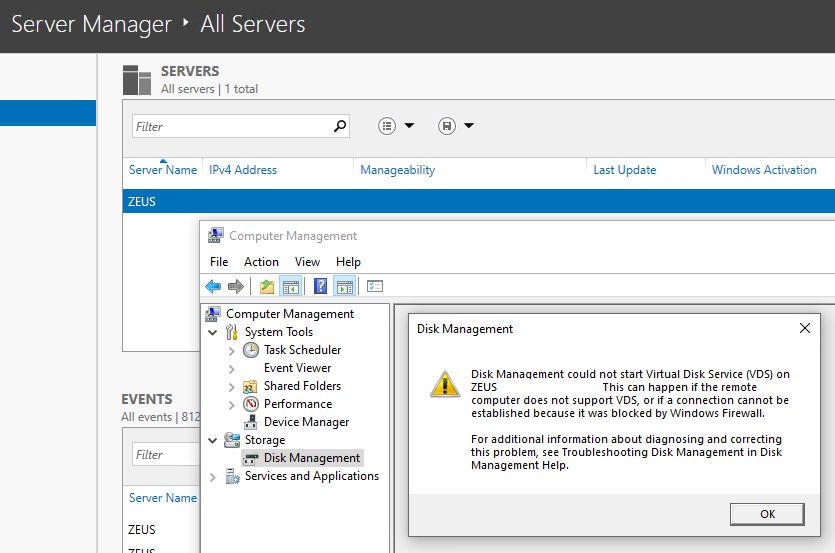
To avoid this error when you remotely managing another servers virtual disks (From “Server Management” you need to follow some steps

Disk Management could not start Virtual Disk Service (VDS) on SERVER-NAME. This can happen if the remote computer does not support VDS, or if a connection cannot be established because it was blocked by Windows Firewall.

For additional information about diagnosing and correcting this problem, see Troubleshooting Disk Management in Disk Management Help.

Step1: 

Check Virtual Disk Service is started on BOTH the local and remote system

Powershell:

Start-Service -Name "vds"

CMD:

net start vds

Step2: 

Add firewall exceptions on BOTH the local and remote system. VOILA! WORKING WITHOUT ANY ERRORS 🙂

netsh advfirewall firewall set rule group="Remote Volume Management" new enable=yes

Step3: 

Use “Server Manager” to connect remotely and access the disk management properties on the remote machine.

no images were found

Windows | System “Recovery Partition” After Upgrade

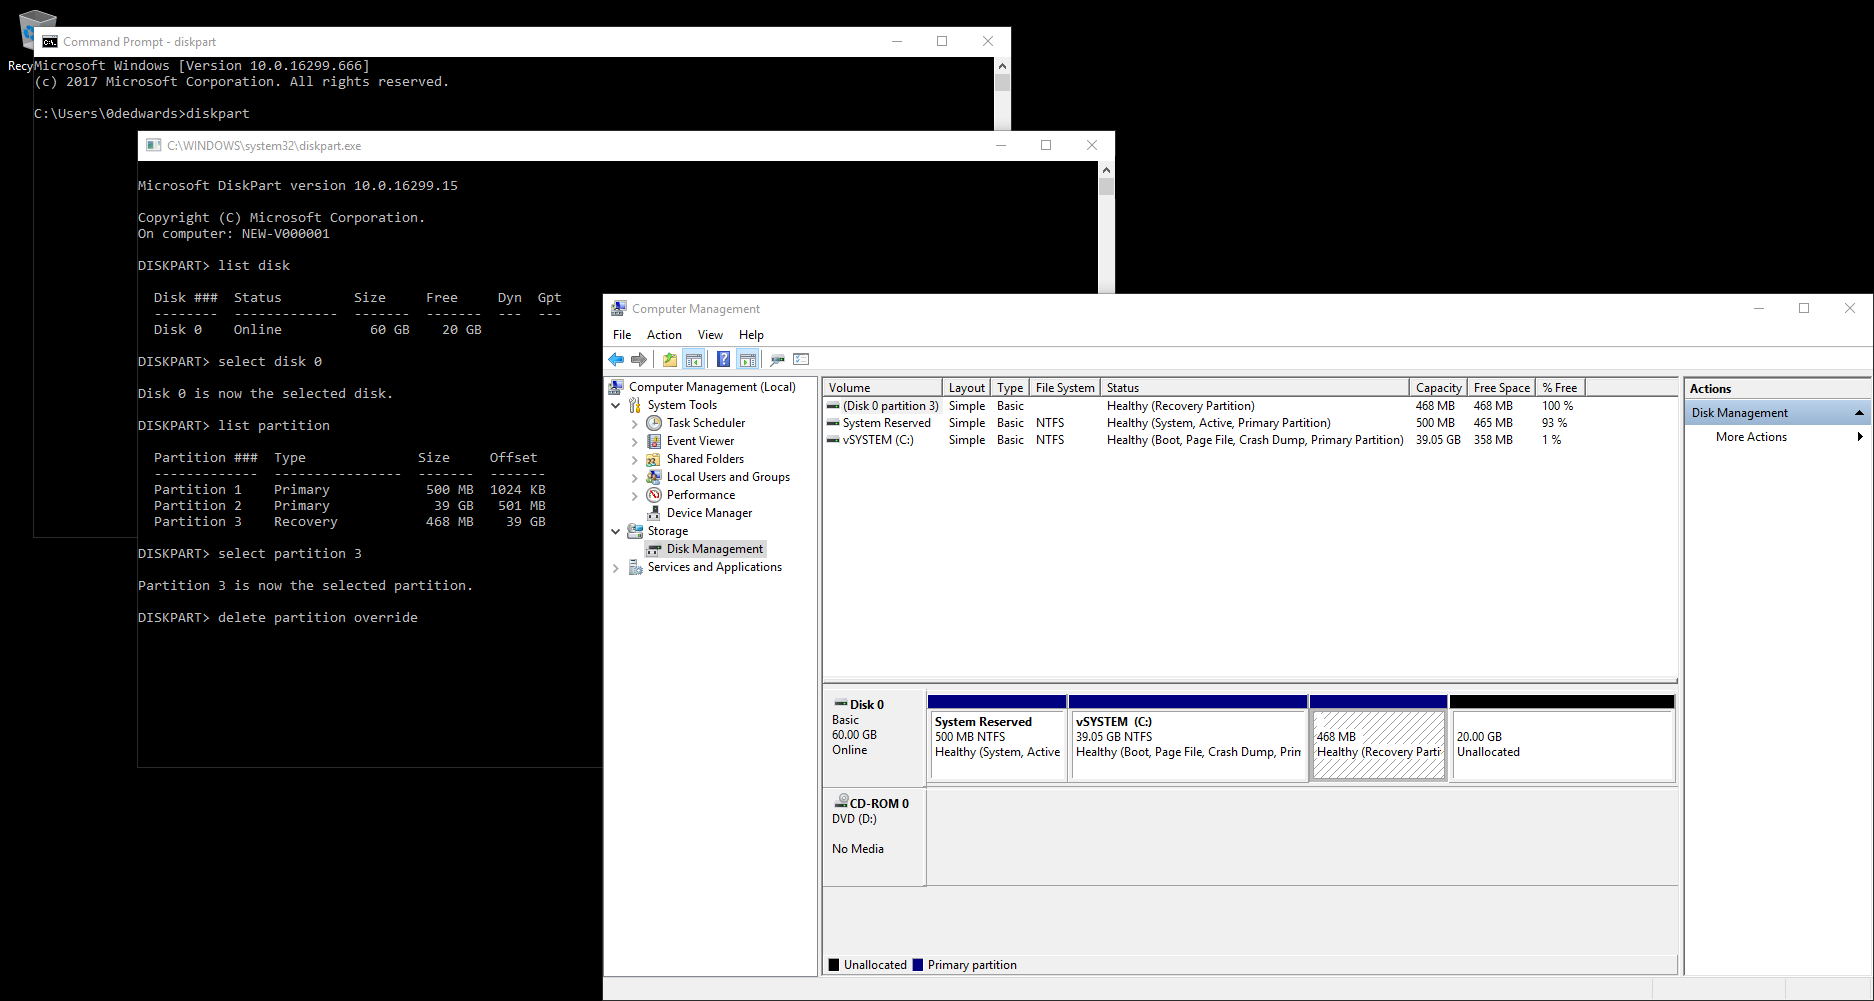
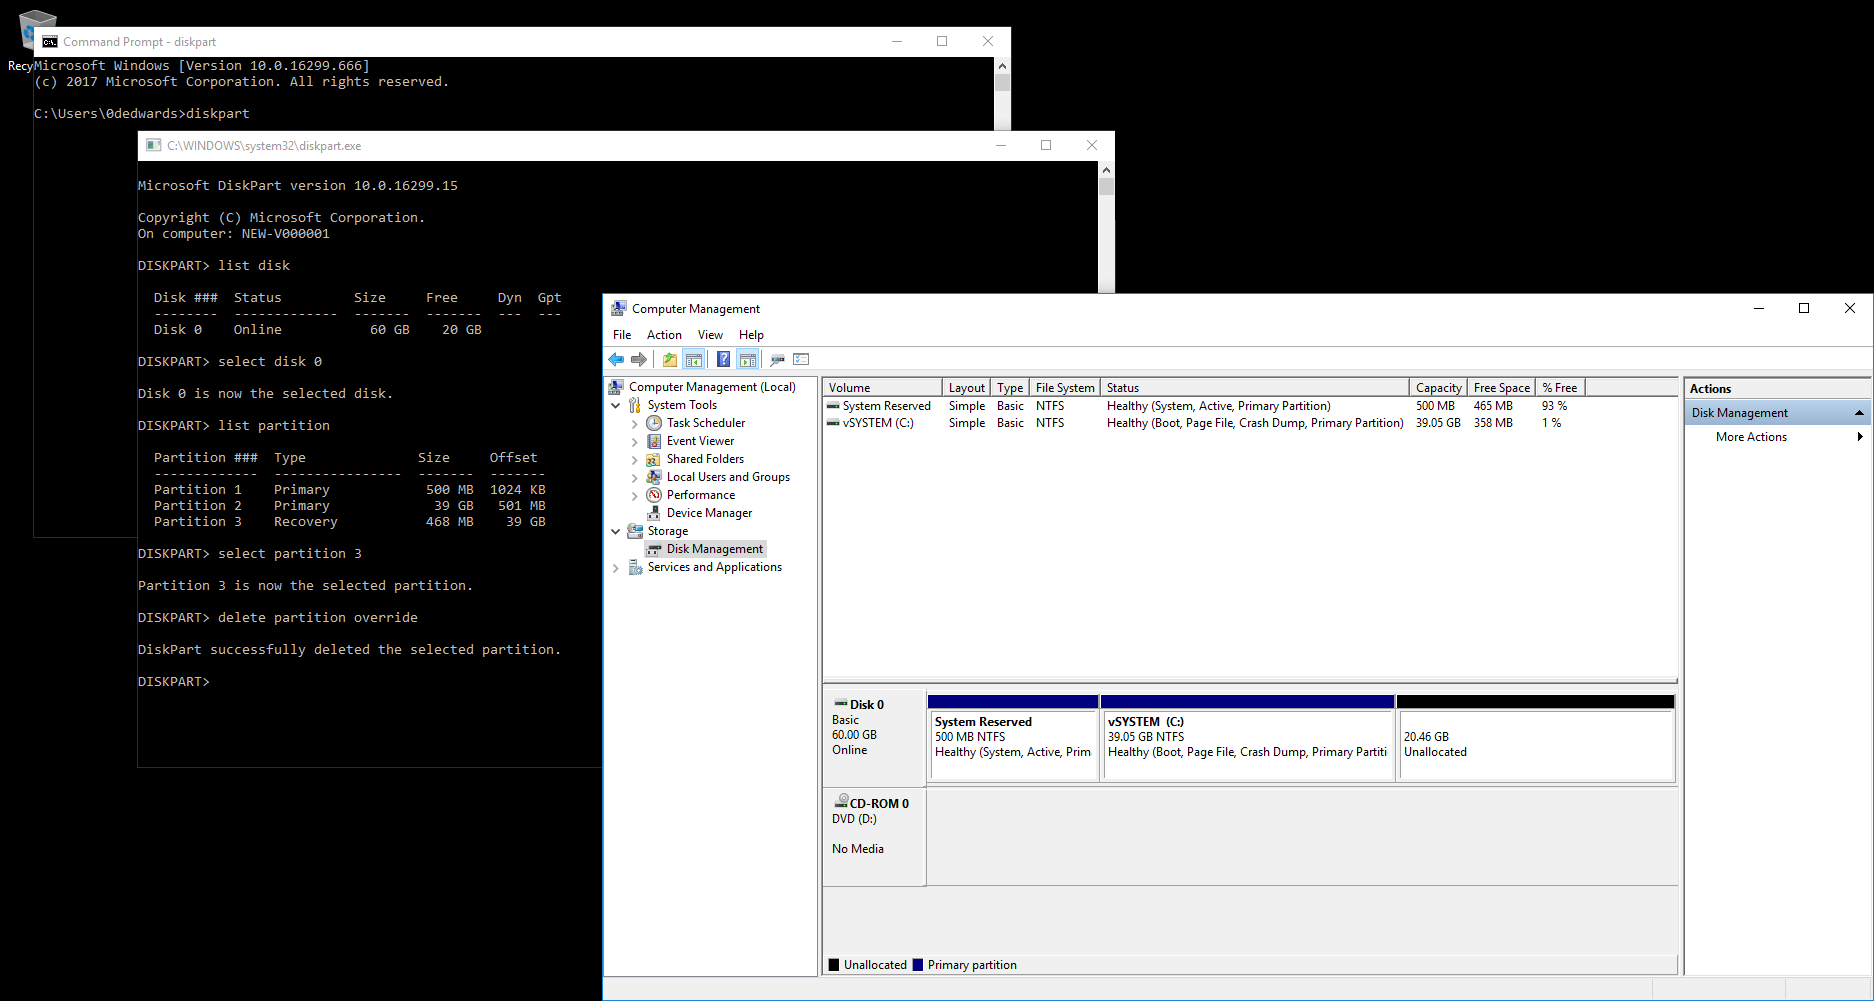
After a Windows 10 or Windows Server (2016/2019) upgrade a new system “recovery partition” gets created at the tailend of the C:\ this isn’t usually a problem for physical machines but for VM it can cause some issues if you wish to “extend” the VDMK/Partition size.

You can quickly remove the partition using “diskpart” and continue your extend. From what I’ve seen this shouldn’t cause any major issues. To be honest we rarely use any of the Windows features for restores as snapshot and backup usually fix them.

diskpart
list disk 
select disk X
list partition 
select partition X
delete partition override

Before:

After:

Windows Dedup | Cheat Sheet

Get dedup status:

Get-DedupStatus

Get dedup status formatted & additional info:

Get-DedupStatus | fl

Get dedup status for specified volumes:

Get-DedupStatus -Volume "D:","F:"

Show Dedup Metadata (How deduplication is being used) on the server:

Get-Dedupmetadata

Show Dedup Metadata for specified volumes:

Get-Dedupmetadata D:

Enable Dedup Job:

Start-DedupJob D: -Type Optimization -Full

Disable Dedup Job:

Start-DedupJob -Type Unoptimization -Volume <Desired-Volume>

Ref: https://docs.microsoft.com/en-us/windows-server/storage/data-deduplication/whats-new

Windows Default Account Picture Logo Image | Server 2019 vs 2012/2016

Quickest way to customise the Windows logon logo/image/icon is to drop the images in this hidden folder. Images are in bmp and png format.

C:\ProgramData\Microsoft\User Account Pictures

Note: There are some subtle differences between Windows Server 2012 R2 & Server 2019

  1. Windows Server 2019 (doesn’t apply to 2016) has a symbolic link as the folder is actually called “Default Account Pictures” which redirects to “User Account Pictures”
  2. Windows Server 2019 appears to have some additional images with different sizes to Server 2012 & 2016
  • user-32.png
  • user-48.png
  • user-192.png
  • REMOVED user-200.png

Server 2012 R2

Server 2019

The icons can be set using “group policy preferences” and copying images over from a share.


Remove “Windows.old” using Cleanmgr CLI | Windows 10

PowerShell Script for removing the “Windows.old” folder using cleanmgr.exe command line

New-ItemProperty -Path 'HKLM:\SOFTWARE\Microsoft\Windows\CurrentVersion\Explorer\VolumeCaches\Temporary Setup Files' -PropertyType 'DWORD' -Force -Name 'StateFlags1337' -Value 0x2
New-ItemProperty -Path 'HKLM:\SOFTWARE\Microsoft\Windows\CurrentVersion\Explorer\VolumeCaches\Previous Installations' -PropertyType 'DWORD' -Force -Name 'StateFlags1337' -Value 0x2
cleanmgr.exe /SAGERUN:1337

Great post on the syntax of “Cleanmgr.exe”

https://winaero.com/blog/cleanmgr-exe-command-line-arguments-in-windows-10/ 

SQL Firewall Rules | PowerShell

Add Windows Firewall exclusions for Microsoft SQL using PowerShell

Set-ExecutionPolicy -ExecutionPolicy RemoteSigned
#Enabling SQL Server Ports
New-NetFirewallRule -DisplayName “SQL Server” -Direction Inbound –Protocol TCP –LocalPort 1433 -Action allow
New-NetFirewallRule -DisplayName “SQL Admin Connection” -Direction Inbound –Protocol TCP –LocalPort 1434 -Action allow
New-NetFirewallRule -DisplayName “SQL Database Management” -Direction Inbound –Protocol UDP –LocalPort 1434 -Action allow
New-NetFirewallRule -DisplayName “SQL Service Broker” -Direction Inbound –Protocol TCP –LocalPort 4022 -Action allow
New-NetFirewallRule -DisplayName “SQL Debugger/RPC” -Direction Inbound –Protocol TCP –LocalPort 135 -Action allow
#Enabling SQL Analysis Ports
New-NetFirewallRule -DisplayName “SQL Analysis Services” -Direction Inbound –Protocol TCP –LocalPort 2383 -Action allow
New-NetFirewallRule -DisplayName “SQL Browser” -Direction Inbound –Protocol TCP –LocalPort 2382 -Action allow
#Enabling Misc. Applications
New-NetFirewallRule -DisplayName “HTTP” -Direction Inbound –Protocol TCP –LocalPort 80 -Action allow
New-NetFirewallRule -DisplayName “SSL” -Direction Inbound –Protocol TCP –LocalPort 443 -Action allow
New-NetFirewallRule -DisplayName “SQL Server Browse Button Service” -Direction Inbound –Protocol UDP –LocalPort 1433 -Action allow
#Enable Windows Firewall
Set-NetFirewallProfile -DefaultInboundAction Block -DefaultOutboundAction Allow -NotifyOnListen True -AllowUnicastResponseToMulticast True

Windows Server 2016 | Remove WSUS (Completely)

Trying to completely remove WSUS isn’t as straight forward as uninstalling the role.
These steps are based on WSUS using the WID database (Not SQL)

In Summary:

  • Remove Windows Update Servers (WSUS) role & Windows Internal Database (WID)
  • Remove WSUS cache & Update Services directories
  • Remove WSUS website in IIS
  • Reboot

PowerShell:

Uninstall-WindowsFeature -Name UpdateServices,Windows-Internal-Database
Remove-Item –path D:\WSUS, C:\Windows\WID –recurse
Remove-Item –path C:\Users\MSSQL$MICROSOFT##WID
Remove-Item –path C:\Scripts, C:\Temp –recurse

Remove-Item –path C:\Program Files\Update Services –recurse 

Remove-WebSite -Name "WSUS Administration"
Restart-Computer

References: ServerFault

Windows Time Commands | Cheatsheet

Check time service is running (Local & Remote):

sc query w32time
sc \\HOSTNAME query w32time

Displays all local time information (Local & Remote):

w32tm /query /configuration
w32tm /query /configuration /computer:HOSTNAME

Display Windows Time service status (Local & Remote):

w32tm /query /status
w32tm /query /status /computer:HOSTNAME

Display Windows Time service source (Will return one line: local CMOS vs Server) (Local & Remote):

w32tm /query /source
w32tm /query /source /computer:HOSTNAME

Display a list of peers and their status:

w32tm /query /peers

Displays current time (local source)

Time /T

Resync local computer time against time server: (run on all servers, except time server)

w32tm /resync /rediscover 

Force local computer time to update against domain server (Local & Remote):

w32tm /config /syncfromflags:domhier /update
w32tm /resync /rediscover w32tm /resync
w32tm /config /syncfromflags:domhier /update /computer:HOSTNAME
w32tm /resync /rediscover w32tm /resync

Start time server via CLI (Local & Remote)

net start w32time
SC \\HOSTNAME net start w32time

Restore Windows Time Service (if it has been broken)

net stop W32Time
w32tm /unregister
w32tm /register
net start W32Time
sc query W32Time

Set Time Update NTP source

@echo off
net stop w32time
w32tm /config /syncfromflags:manual /manualpeerlist: 0.uk.pool.ntp.org
w32tm /config /reliable:yes
net start w32time
w32tm /query /peers
PAUSE

Event Viewer Error Message:

Event Type: Error 

Event Source: W32Time 

Event Category: None 
Event ID: 12

Description: Time Provider NtpClient: This machine is configured to use the domain hierarchy to determine its time source, but it is the PDC emulator for the domain at the root of the forest, so there is no machine above it in the domain hierarchy to use as a time source. It is recommended that you either configure a reliable time service in the root domain, or manually configure the PDC to synchronize with an external time source. Otherwise, this machine will function as the authoritative time source in the domain hierarchy. If an external time source is not configured or used for this computer, you may choose to disable the NtpClient.

To resolve the eventID 12:

  • w32tm /register

Reference: 

Enable ICMP (Ping) & WMI | CMD Line

Without enabling ICMP ping requests will not get a reply from the server.

Enable ICMP using “netsh firewall” (Old Method):

netsh firewall set icmpsetting 8

Enable ICMP using “netsh advfirewall” (New Method):

netsh advfirewall firewall add rule name="ICMP Allow incoming V4 echo request" protocol=icmpv4:8,any dir=in action=allow

Enable WMI using “netsh advfirewall” (New Method):

netsh advfirewall firewall set rule group="windows management instrumentation (wmi)" new enable=yes