Category Archives: Hardware

APC UPS | Management Card

Rebooting APC/UPS management card

  • Method 1: Using Web interface under “Administration->General->Reset/Reboot->Reboot Management”
  • Method 2: Using Putty (SSH) Session using “reboot” command.
  • Method 3: Physically pressing the “reset” button on the management card

VMware “TPM 2.0 device detected” | Dell PowerEdge

When deploying new ESX (v7.0.2 Ud) on new Dell PowerEdge (R350) server the following message appears after the installation of ESX and adding to vCenter


It appears that you can’t deploy out the box with a TPM tweak in the BIOS to allow clearing this error.
I placed the iDRAC console into “BIOS boot mode” (to save faffing about pressing “F8,F2,F5” keys, whichever one it is) before rebooting.

System BIOS -> System Security | Enable “Intel(R) TXT”

System BIOS -> System Security -> TPM Advanced Settings | Enabled “SHA256”

After a reboot of the host, the error can be cleared back in vCenter

Note: The server is not currently using “Secure Boot”

APC UPS | Unable to login to APC Management

Error when trying to connect to the APC UPS management GUI (This is probably only applicable on the older models and firmware versions, but lets face it there’s a shed load of these older units gathering dust at the bottom of the rack somewhere, they get missed unless they start bleeping!)

“Someone is currently logged into the APC Management Web Server. Please try again later”

Continue reading

Dell PowerEdge Servers | Internal Dual SD Module (IDSDM) Failure

We are running Dell R620/630 servers with “Internal Dual SD Module” (IDSDM) for the VMware ESX installation.
Unfortunately SD card 1 recently developed a fault.
As the IDSDM is configured in a fail-over SD1 copies to SD2 therefore we had to swap the cards before performing the rebuild.

It is important to note a few IDSDM module behaviors: IDSDM White Paper

Mirror State Stored on the IDSDM module

The SD cards mirror state, along with the Disabled or Mirror mode for modular servers, is stored on the IDSDM module itself. This means that it is possible to move an IDSDM module between two systems and preserve the mirror; the BIOS will read the states from the cards during boot up and will reflect the state of the card in setup.

Master SD Card

The module design allows that either SD card slot can be the master; in the event of a tie between the two cards, then SD1 is picked as the master. For example, if two new SD cards are installed in the IDSDM while AC power is removed from the system, SD1 is considered the Active or master card in the mirror. SD2 is the backup card, and all file system IDSDM writes will go to both cards, but reads will occur only on SD1. If at any time SD1 fails or is removed, SD2 will automatically become the Active (master) card. The IDSDM module should not be serviced while AC power is present.


Continue reading

Draytek VPN to iPhone/iOS Setup

There’s a fairly quick and simple method to configure VPN from the Draytek to iPhone.

I’m configuring this on a Draytek 2860n-Plus but the same process applies to most Draytek interfaces.

If you don’t have a static IP then you can configure using a free DynDNS name from no-ip.org (Other dynamic DNS providers are also available)

This method is using L2TP with IPSEC. A guide to the various VPN types can be found on HowtoGeek

Draytek 2860 Setup

VPN and Remote Access -> VPN and Remote Access -> Remote Access Control”

Enable “IPsec” & “L2TP” VPN Services (These may already be enabled by default)

Continue reading

Benchmarks | SD Cards

Are the Sandisk Extreme Pro 95MB/s SD Cards really worth the extra ££ ?

I benchmarked the following cards using CrystalDiskMark. The results show that the 95MB/s didn’t perform as well as expected. This might not be the most scientific of tests but were completed under the same conditions, same machine using a built in SD Card reader connected directly to the motherboard headers.

Sequential Read Sequential Write
10MB/s 19.260 5.084
30MB/s 18.91 17.69
45MB/s 31.33 26.23
95MB/s 31.20 27.21

Continue reading

HP Proliant Microserver (Gen8) | Windows Server 2012 R2 Storage Drivers

My configuration of the HP Microserver G1810T uses all 4 x HDD disk bays (2 x RAID1) with 1 x HDD (2.5″) attached to the secondary SATA connector on the motherboard.
This 5th disk for the OS was configured under the controller options to use RAID0.

When installing Windows Server 2012 R2 for the first time you will need to specify the B120i controller drivers for Windows to be able to see the disk.
The driver can be downloaded from the HP Microserver webpage and is listed under the “Driver – Storage” section.

The ILO made it easy for me to install Windows remotely from my desktop and attaching virtual media (ISO) and folders. Continue reading

DNS timeout on Draytek Router

DNS timeout 

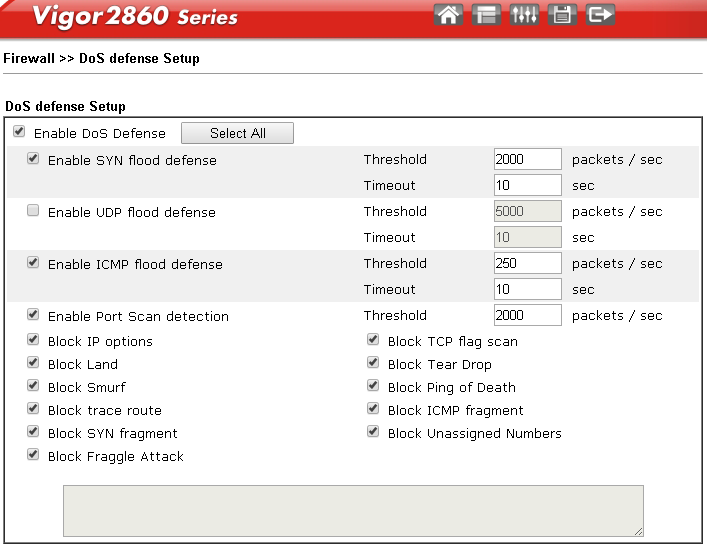
Having had a problem with my TalkTalk internet connection for months I thought the issue was related to TalkTalk DNS settings however this was actually due to the “UDP flood defense” setting on the Draytek “Firewall” which blocks DNS queries after a threshold value.

The symptoms were that DNS would just stop working, no DNS resolution at all, NSLOOKUPs would simply timeout but ping and IP resolution would function normally. Rebooting the Draytek would magically fix the issue.

The fix was to simply increase the “packet/sec Threshold” or “disable” the setting.
Note: The DoS defense settings are not enabled by default


Continue reading

Dell PowerEdge Servers | iDRAC Interface & Connection Issues

Configuring iDRAC IP (From Windows)

If you want to configure the iDRAC while in Windows the best option is to install “Dell Open Manage Server Administrator” this will allow you to open the web interface and assign the iDRAC IP. The default iDRAC IP is “192.168.0.120” so unless you have a system on this subnet to connect you will need to use another method.

  • Default OMSA address: https://localhost:1311/
  • Authentication is using a standard Windows Administrator username/password without the “domain\”
  • The iDRAC options are displayed under: System -> Main System Chassis -> Remote Access

If you are configuring iDRAC outside windows the default login is:

  • Default Username: root
  • Default Password: Calvin

Unable to connect to iDRAC IP:

If you are unable to connect to the iDRAC via HTTP/Web Interface even though it is responding to ICMP (Ping) request it most likely needs a kick! or a reboot (of just that component) Best option is to putty into it.

Resets/Reboots iDRAC:

  • racadm racreset (Reset)
  • racadm -r <ip address> -u <username> -p <password> racreset(Passthough Credentials)
  • racadm -r <ip address> -i racreset (Prompt for Credentials)


Resets/Reboots iDRAC (Factory Defaults):

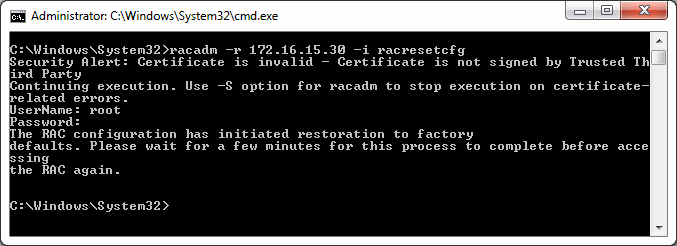
  • racadm racresetcfg (Reset)
  • racadm -r <ip address> -u <username> -p <password> racresetcfg (Passthough Credentials)
  • racadm -r <ip address> -i racresetcfg (Prompt for Credentials)

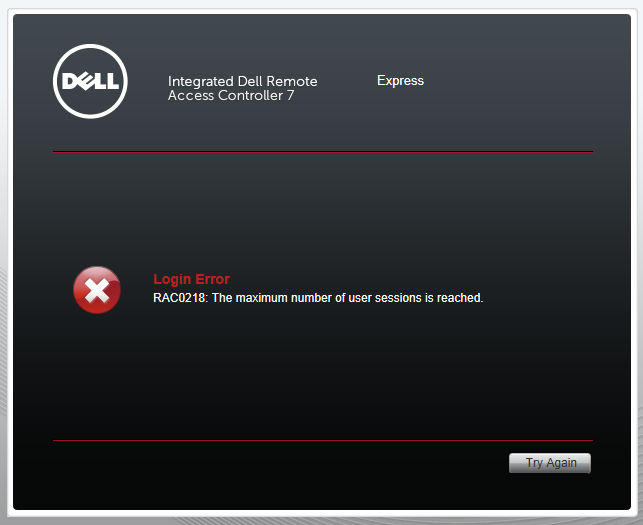
Unable to connect to iDRAC “Maximum number of user sessions is reached”

I tried to SSH to the IP using putty (Method Above) but got the same error.

In order to resolve this I used the following command from another server which had Dell Open Manage installed.

racadm -r 192.168.1.2 -u root -p Passw0rd racreset soft
racadm -r 192.168.1.2 -i racreset soft

Downloads:

Cisco Backup Config | TFTP

Backing up Cisco switch / router config to TFTP location:

  1. Install TFTP on server: http://tftpd32.jounin.net/tftpd32.html
  2. Login to device via Telnet (Using Putty if needed putty.org)
  3. Password: <Enter Password>
  4. SW001>en
  5. SW001><Enter en Password>
  6. SW001>copy run tftp
  7. SW001>192.0.?.? <Specify I.P. Address / Don’t use name as DNS may not be configured>
  8. SW001><Press “Return”> – This will dump the config into the root configured on the TFTP
  9. SW001>Exit

HP Proliant Microserver | AMD RAIDXpert RAID Rebuild

I recently developed a few faults with Windows Server 2008 R2 install running on my HP Proliant Microserver.
A number of posts and articles suggested the fault maybe the result of a faulty HDD therefore I ran a series of disk checks and applications to verify. Unable to locate any faults I opted to remove both 2TB HDDs (configured in RAID1) in order that I could dock them in another workstation and run thought some more thougher checks.
strangely as a result of removing the HDDs the Windows “BSOD” and crashing did stop, however I was still unable to locate any errors on the HDDs.

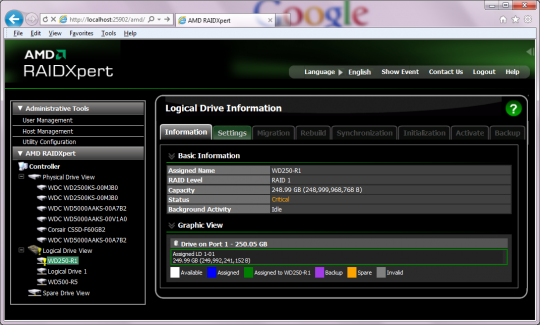
Rather than installing both HDDs back in the system, I thought it best to only reinstall one HDD in order to fault find, therefore breaking the RAID. Once happy that the fault was correct (Never found out the issue) I started RAID1 rebuild process using the following steps.

Continue reading

Yamaha RX-V671 | “PCM” Output

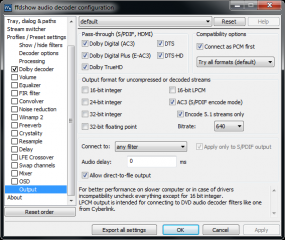
I own a Yamaha RX-V671 Amp which my media PC is connected to via HDMI. One of the issues I get is that when playing audio via the HDMI output, the Yamaha amp display shows “PCM” when I need this to display “Dolby Digital” or “DTS”.

In layman’s terms Pulse Code Modulation (PCM) is a digital scheme for transmitting analog data. Basically this means that the media PC converts the audio into digital and sends this to the amp to output. My objective is for the media PC to output the audio in the original format and let the Amp do the processing (whereby this should display “Dolby Digital” or “DTS” etc.

One of the main methods for playing Videos on the Media PC is by using Kazaa Codec Pack and Media Player included with the install. A quick way to install this is by using www.ninite.com and selecting “Kazaa Codec” pack.

When playing video/audio through Media Player classic, the default installation will output audio via PCM, to correct this, you need to modify the “output” settings on the “FFDShow Audio Decoder Configuration” and enable the “Pass-through” options. The FFDShow icon will display in the taskbar when you play content using it.

Cisco ASA 5505 | Basic CL

Factory Reset | ASA5505

  1. Attach Console Cable
  2. Load Putty, connect on “Console”
  3. Type ‘ena’ to go to enable mode. Enter the password, or just press enter if there is no password set.
  4. Type ‘config t’
  5. Type ‘config factory-default’
  6. Hit spacebar when the ‘more’ thing happens. You want to get back to the prompt that looks like: ‘ciscoasa(config)#’
  7. Type ‘reload save-config noconfirm’
  8. Make sure that the outside line is plugged into port zero, and your pc is plugged into any of the ports 1-7.
  9. The Cisco ASA has been reset to factory settings. DHCP is enabled on the cisco device, and it’s internal IP address is now 192.168.1.1!
  10. If you had an enable password set, you may need to enter that in the password box when you try to connect using the ASDM. Otherwise the default username and password is to leave both blank.
  11. Default Password: cisco

Output Config inc. ikev1 pre-shared-key | ASA5505

more system:run

Export Config:

copy runnin-config tftp
config000001
&lt;your TFTP IP&gt;

HP Proliant Microserver | AMD RAIDXpert Utility Software Download Link

Please can someone tell me WHY is it so HARD to find the DOWNLOAD for “AMD RAIDXpert” ? Makes me so frustrated when you know the software you need (it’s free) but there are so many links and hoops to jump through in order to download it!

As of 2021 there seems to no longer be any valid URLS for “AMD RAIDXpert” hosted by AMD or HP (The HP Microserver “SB7xx/SB8xx Chipset” driver redirects you to a dead AMD page)

I kept a copy of this software to save time searching for it. This is the AMD RAIDXpert Utility URL for the AMD SB7xx/SB8xx Chipset:

AMD RAIDXpert Utility Info:

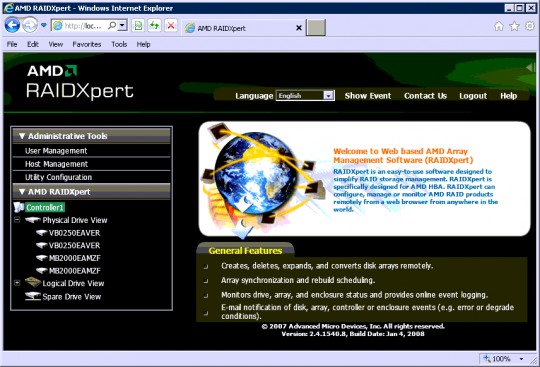
AMD RAIDXpert utility gives you complete control of your RAID arrays within a simple web browser based application. This tool allows you to monitor and manage your RAID arrays in the Microsoft Windows environment or via remote login to your system.

Once installed you can access the application via startmenu shortcut

  • URL: http://localhost:25902/amd/screen.jsp
  • Default Username: admin
  • Default Password: admin

How to Configure AMD RAIDXpert for E-mail Notifications (AMD Direct URL) 


Locating hardware serial number in Windows:

  1. HP Serial number finder or wmic bios get serialnumber

Solid State Drives SSD config (Best Practice)

From all the reading I have done on SSDs this is a known list of best practices in order to minimise read/write and maintain its health for longer:

Wiki SSD

Disable SuperFetch (Windows 7) this performs the same as Prefetch:

  • services.msc -> SuperFetch Properties -> Disabled
  • run -> “net stop superfetch”
  • run -> “sc config sysmain start= disabled” (This will set the Sysmain (Superfetch) Service startup to disabled)

Disable Disk Defragmenter Schedule (Windows 7):

  • run -> “dfrgui” (Disk Defrag Interface)
  • Click “Configure Schedule”
  • Click “Select disks…”
  • Unselect SSDs
  • Alternatively you could just remove all defrag schedules

Disable/Move Pagefile (Windows 7):

  • Win+Pause (System Properties) -> Advanced system settings -> “Advanced” Tab -> Performance “settings…”
  • In Performance Options -> “Advanced” Tab  -> Virtual Memory “Change…”
  • In Virtual Memory -> Untick “Automatically manage paging file size for all drives. -> Select SSD letter -> “No paging file” -> Set -> OK

Disable Disk Indexing (Windows 7):

  • My Computer -> Select SSD -> right click “Properties -> Untick “Allow files on this drive to have contents indexed to addtion to file properties”

Also disable the Search Service

  • run -> “net stop WSearch”
  • run -> “sc config WSearch start= disabled” (This will set the WSearch (Windows Search) Service startup to disabled)

Continue reading

HP Proliant Microserver | Benchmarking

HP Microserver 1: AMD Athlon II Neo N36L 1GB RAM 160GB (P/N: 612275-421)

I finally got round to benchmarking some Graphics cards on the HP Microserver. Although I have not played around with much benchmarking before I thought I would start here as it seems to be a hot topic at present.

My first thoughts were “What do people really want out of the HP Microserver?” – Originally I wanted it as a replacement to my Acer Aspire Revo 3600 and run it as my dedicated HTPC. However this developed through time to become a replacement for my NETGEAR MS2000 Stora NAS while streaming the shares and content to my Acer Aspire Revo 3600 running XBMC.

I was previously using the Negear Stora, but was not satisfied that if the drive failed that I could easily get the data from one of the mirrored disks due to its XFS file system. There are some guides to doing this and I played around with accessing the XFS HDD from a Linux VM but this got quite messy and I had to refer to the good old rule “K.I.S.S.” therefore decided to purchase 2 x 2TB hard drives for the Microserver, RAID1 them and then dump all my media onto here and share using the Dreamspark version of Windows Server 2008 with shared folders. A nice method, however this didn’t allow me to use Streaming Media to my DNLA enabled devices, TV, iPhone, WDTVLive & other Windows 7 Computers.

With the release of Windows Home Server 2011 and dedicated DNLA support I decided I would install this as a VM on top of Windows Server 2008 R2 – 100% NOT SUPPORTED and definately frowned upon by many. But it is all in the name of testing and experimenting with the system. The reason I did this was that in order that I was still able to play around with Hyper-V and Windows Server 2011.

HP Microserver Number 2: AMD Athlon II Neo N36L 1GB RAM 250GB (P/N: 633724)

I recently purchased my 2nd Microserver to play around with Citrix Xen Server and would allow my current Windows Server/Home Server 2011 to stay in one piece. Xen works fine on this box, however I have not put it to the test and only had a limited number of VM’s on the system so will look at the development of this later on.

Following on from my original article I decided to see how well the performance was of the Radeon HD5450 Graphics Card. There has been a lot of talk about whether this card will do a good job as it seemed to be the fastest low profile card (at time of this article) that could be found. To try and improve performance I decided to run with Windows 7 x64 as the base OS, this offered fully supported drivers for all the graphics cards.

Windows 7 was installed on an external HDD and attached using the eSATA connection. A good solution if you don’t want to mess around with the current drives and OS already installed.

I ran through a number of tests on the following cards:

  1. Original Radeon 4200 (This is the onboard graphics card) – VGA with no Audio
  2. PNY Geforce 8400GS (Low Profile PCIe) with Heatsink – HDMI with Audio
  3. Sapphire HD5450 (Low Profile PCIe) with Heatsink – HDMI with Audio

I used the following tools for benchmarking: (There maybe better tools available however as I have only played around with this brief this is what I went with)

  1. Passmark Performance Test 7.0 (Trial Version)
  2. 3D Mark Vantage (Free Basic Version) The latest version of 3D Mark 11 only works with Directx 11 cards.
  3. PC Mark 7 (Free Basic Version)
  4. CPUID (Free)
Although it isn’t a fair test comparing onboard vs a 1GB DDR3 Graphics Card. I was really curious as to how much better the performance actually worked out at. The test results don’t display a massive contrast between cards until the 3D results come into it. Throughout all my testing I have come to conclusion that the HP Microserver still isn’t man enough to handle large 720/108o .MKV video files (I could be doing something wrong?). Running media over a 1GBps network link & even playing content locally I still have performance issues and glitching whereby the same media streams perfectly to my WDTVLive.

Passmark Performance Test Scores

  1. Original Radeon 4200 – Score: 440.9 

    no images were found

  2. PNY Geforce 8400GS – Score: 455.6 

    no images were found

  3. Sapphire HD5450 – Score: 468.7 

    no images were found


3D Mark Vantage

  1. Original Radeon 4200 – Score: TBA
  2. PNY Geforce 8400GS – Score: P435

    no images were found

  3. Sapphire HD5450 – Score: P1091

    no images were found


PC Mark 7

  1. Original Radeon 4200 – Score: 974 
  2. PNY Geforce 8400GS – Score: 994 
  3. Sapphire HD5450 – Score:1034

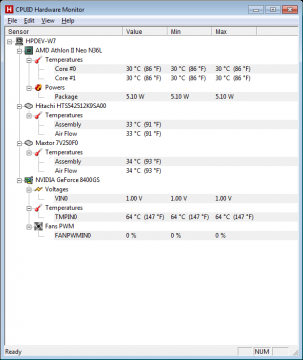
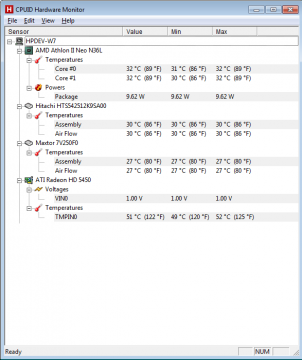
CPUID Temperature Tests

  1. Original Radeon 4200 N/A
  2. PNY Geforce 8400GS 
  3. Sapphire HD5450 

Power Tests:

Another question I always asked myself was whether the Microserver could be left on all day without costing too much and eating up too much power? The results from a electric meter gave a good indication to this and looks similar to leaving a couple of lights on.

Wattage when Idle (GF8400GS Card, 1 x eSATA & 2 x SATA HDD)

no images were found
Wattage when Underload (GF8400GS Card, 1 x eSATA & 2 x SATA HDD)

no images were found